Categories
Development Java

Scan to PDF

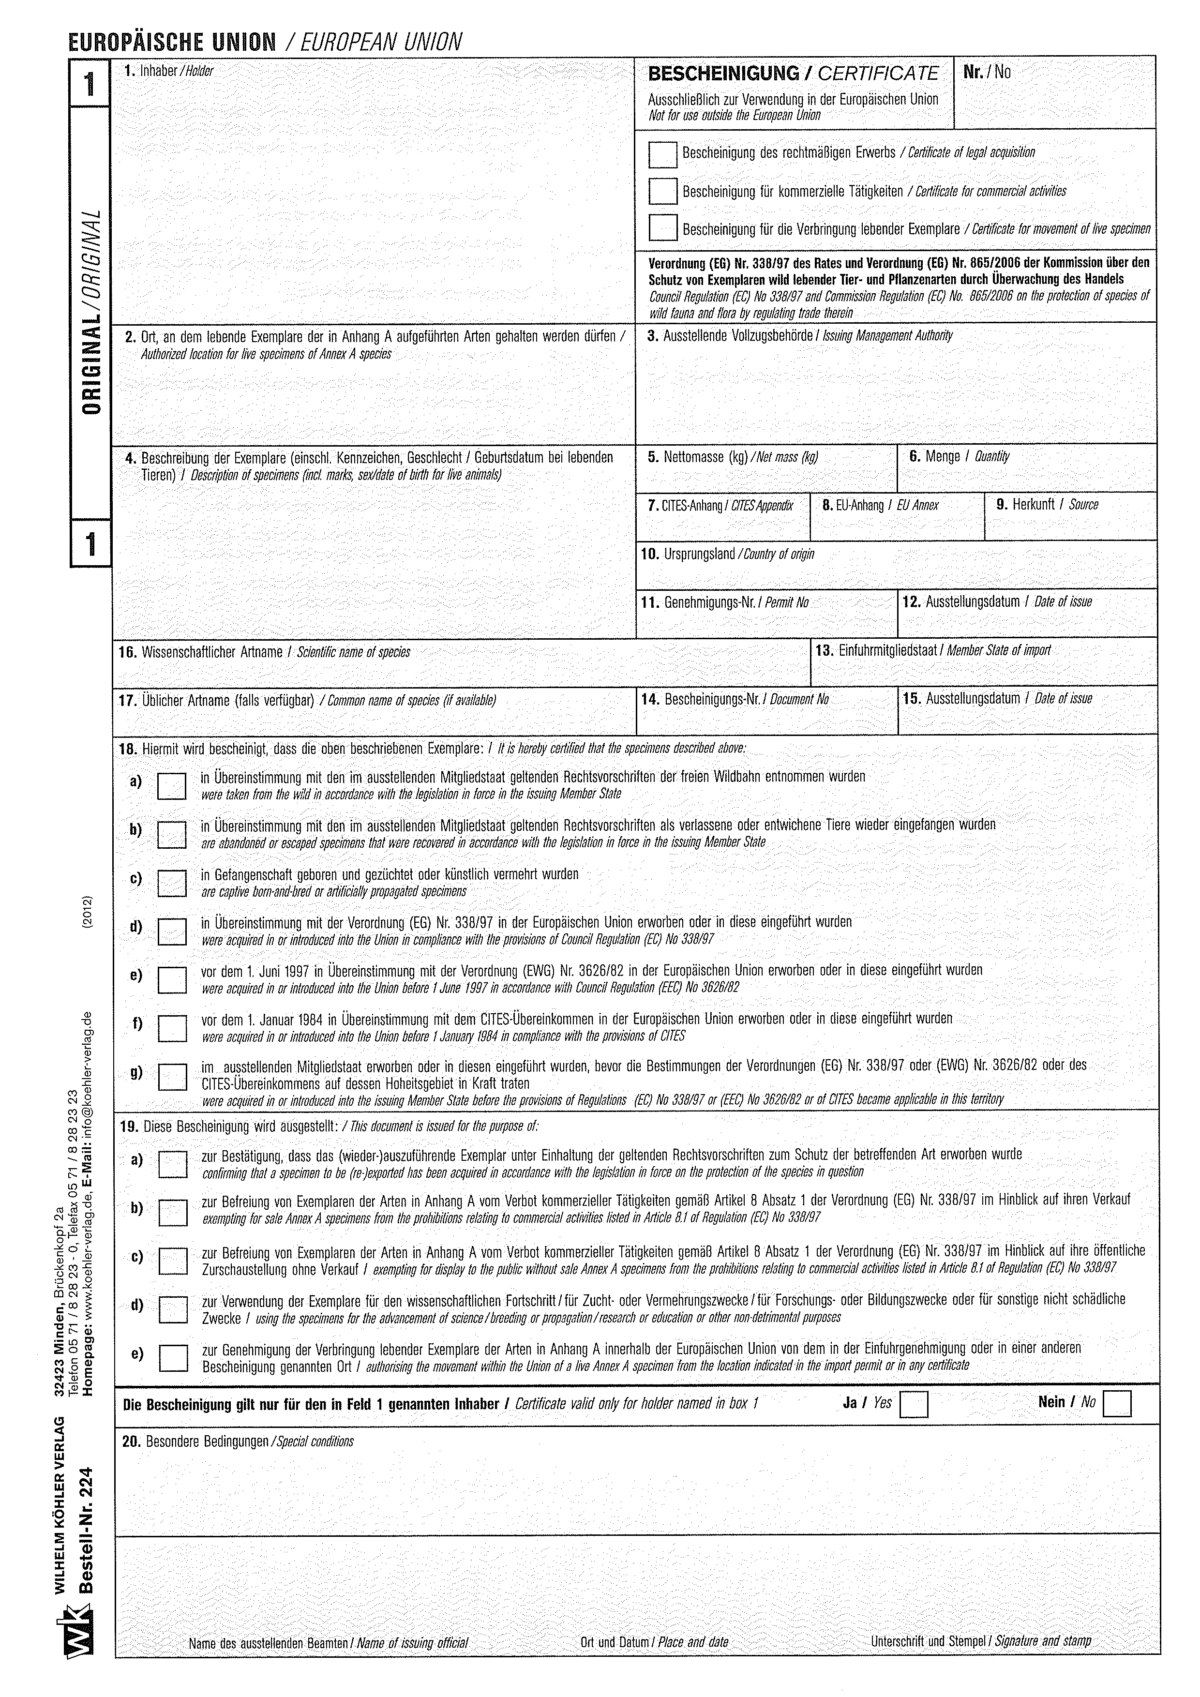
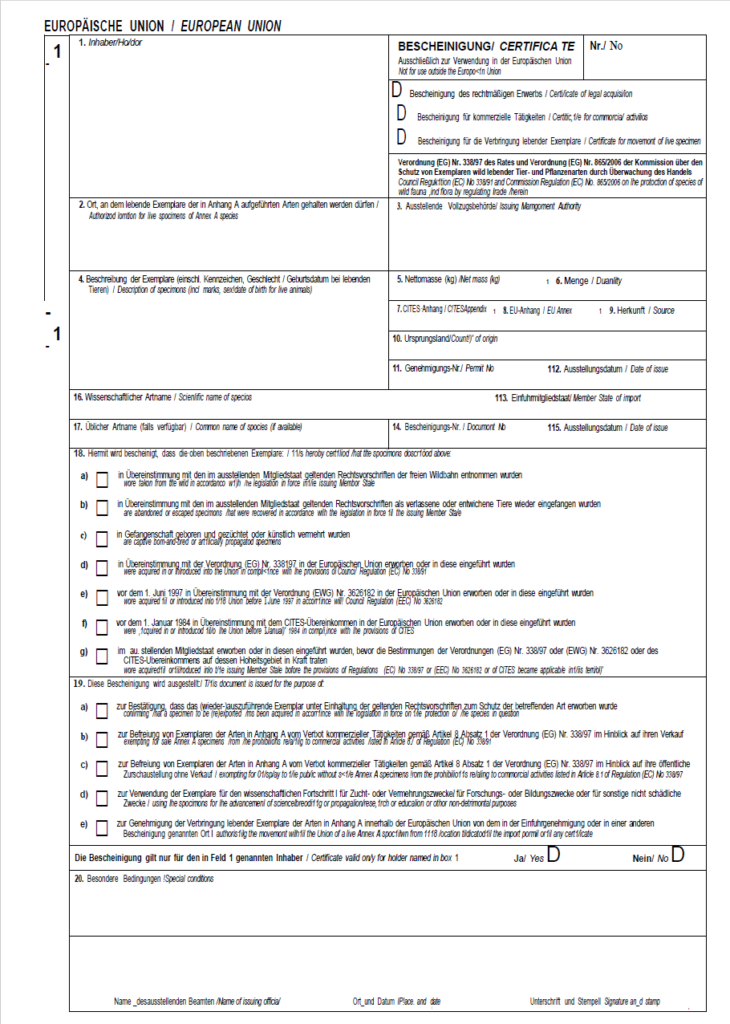
Es muss das Formular mit der Bestell-Nr. 224 (CITES Bescheinigung; im Shop unter Verschiedene Vordrucke, Artenschutz) des Wilhelm Köhler Verlags bedruckt werden.

Wir benötigen zwei PDFs: Eines mit dem Formular und den Formularfeldern und eines nur mit den Formularfeldern, um es auf das Formular zu drucken.

Der Verlag bietet leider keine PDFs an, daher habe ich mir angesehen, ob ich mit vertretbarem Aufwand das Formular nachbauen kann.

Zur PDF Bearbeitung verwende ich Adobe Acrobat Pro.

Der perfekte Scan als Vorlage

Formular als PDF scannen. Anschließend auf einem zweiten Formular ausdrucken und neu scannen, bis Ausdruck und Formular übereinstimmen.

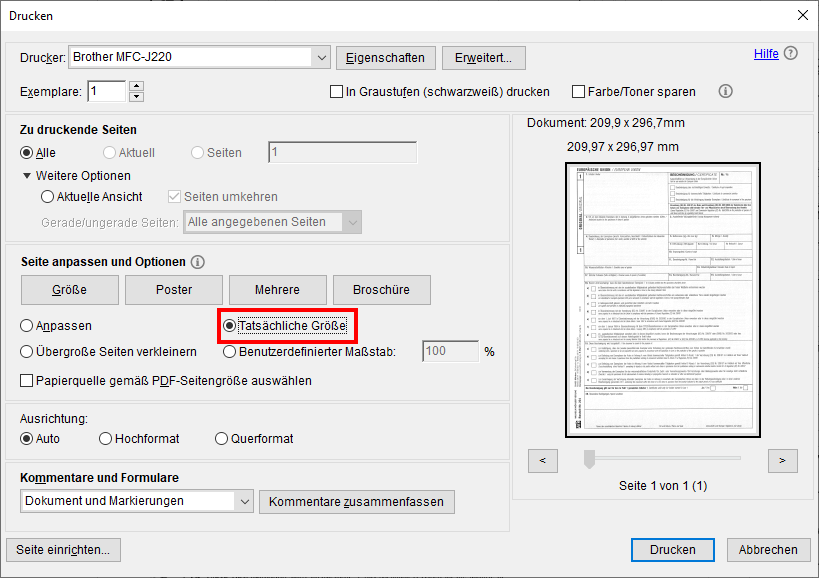
Dabei ist es wichtig, die "Tatsächliche Größe" beim Druck auszuwählen. Voreingestellt ist "Übergroße Seiten verkleinern", was das Druckergebnis verzerrt.

Formularfelder setzen

Das PDF mit dem Scan in Adobe Acrobat Pro öffnen.
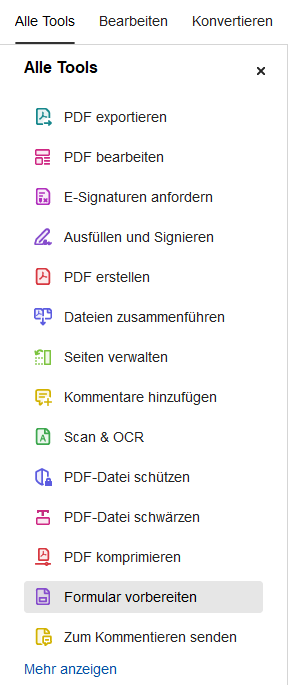
Aus den Tools "Formular vorbereiten" auswählen:

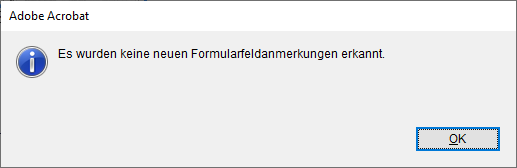
Adobe konnte keine Formularfelder identifizieren:

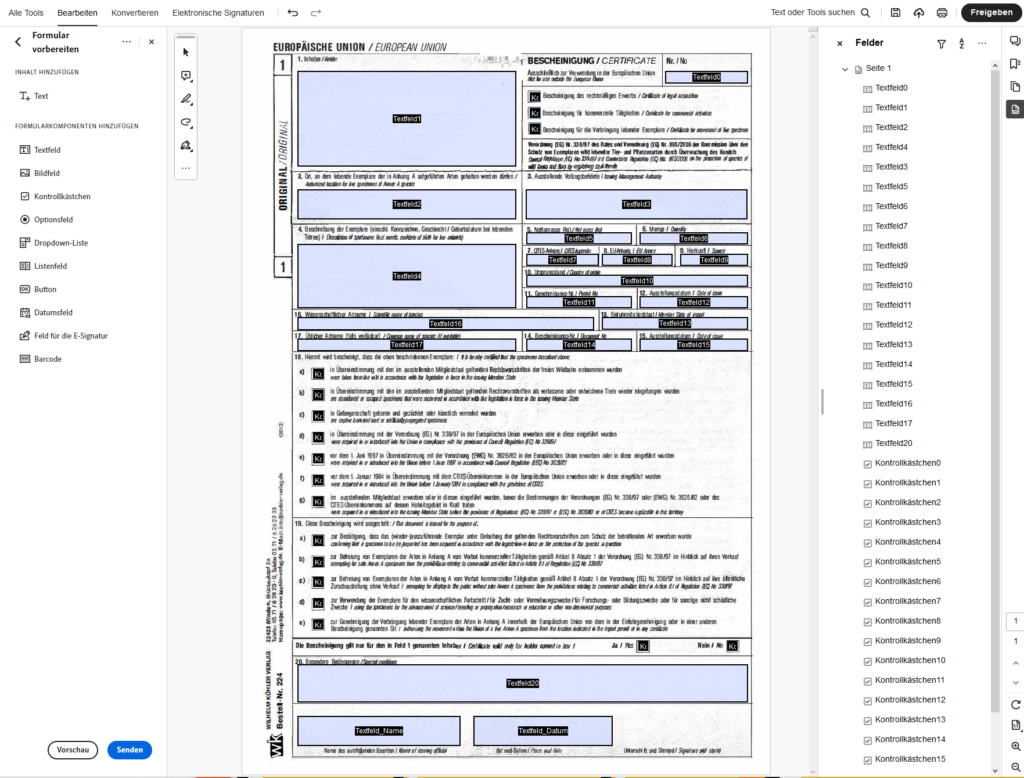
Wir setzen die Felder per Hand, und richten sie anschließend aus, zB mehrere Textfelder am linken bzw. rechten Rand auswählen und in den Eigenschaften unter Position Links, bzw. Rechts, gleich setzen, Breite anpassen etc.

Einige Felder können mehrzeilig sein, das wird in den Eigenschaften unter Optionen aktiviert.

Bei den Kontrollkästchen wird die Randfarbe auf "Keine Farbe" gesetzt und der Kontrollkästchenstil auf "Kreuz".

Alle Formularelemente sind im Text Schriftgrad: "Auto"

Das so bearbeitete PDF wird mit Daten befüllt und von mehreren Mitarbeitern auf Formulare gedruckt, bis die Positionierung der Felder verifiziert ist. Dabei ist wichtig, die "Tatsächliche Größe" beim Druck auszuwählen.

Bei einigen Ausdrucken war grade im unteren Bereich eine leichte Verschiebung zu sehen. Vermutlich war das Formular nicht immer 100%ig grade eingelegt, aber bei ganz genauer Betrachtung stellte sich auch heraus, dass der Scan ganz leicht schief ist.

Scan to PDF

Dass im Hintergrund ein gescanntes Formular verwendet wird, gefällt mir nicht so gut, zB sieht es an einigen Stellen "fleckig" aus, was von dem besonderen Papier des Formulars herrührt. Daher habe ich den Versuch gestartet, aus dem Scan ein PDF zu generieren.

Der erste Versuch schlug grundlegend fehl, da das Programm nicht mit den hochkant stehenden Schriften (unten links, "Bestell-Nr. 224" etc.) zurecht kommt. Daher muss der Scan vorbereitet werden, indem diese Schrift entfernt wird, zumal wir sie auch nicht benötigen.

Scan vorbereiten

Mit dem Tool PDF24 Creator habe ich das Bild aus dem PDF extrahiert und eine TIFF-Datei erhalten.

Die Datei öffne ich mit Paint.net, füge eine weitere Ebene hinzu, die in den Hintergrund kommt, diese wird weiß aufgefüllt.

Die Schrift wird entfernt.

Mit dem Zauberstab-Tool wird so viel wie möglich entfernt, da einiges "Rauschen" im Hintergrund ist. Dazu stelle ich die Toleranz auf einen niedrigen Wert und aktiviere "Globale Auswahl" in der oberen Leiste. Dies ermöglicht es dem Zauberstab, alle passenden Pixel im gesamten Bild auszuwählen, nicht nur zusammenhängende Bereiche.

Als png speichern.

Scan to Docx

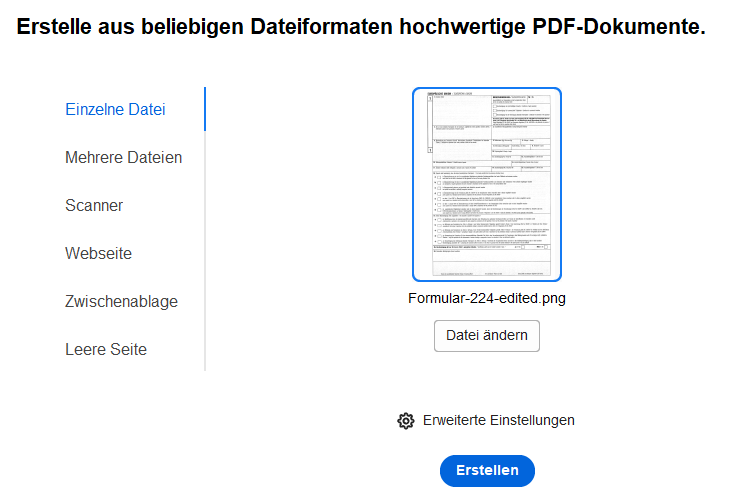
In Adobe Acrobat Pro ein PDF aus der png-Datei erstellen.

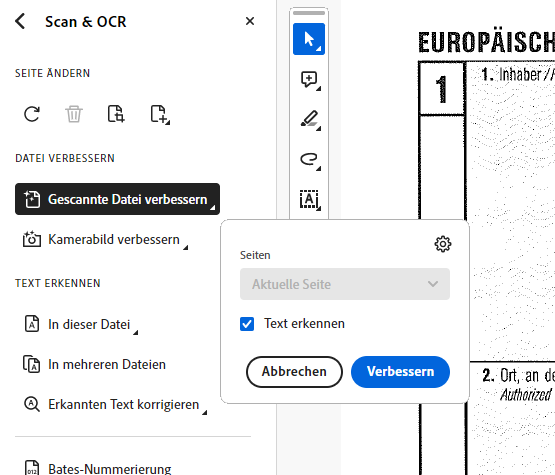
Aus dem Alle Tools Menu Scan & OCR auswählen. Gescannte Datei verbessern. Und dann Text erkennen -> In dieser Datei.

Speichern unter: Konvertieren in "Windows Word (*.docx)"

Docx to PDF

In Adobe Acrobat Pro ein PDF aus der docx-Datei erstellen.

Der erste Versuch sah bei mir schon ganz gut aus:

Fazit

Leider war es dann so, dass ich bei späteren Versuchen schlechtere Ergebnisse erzielt habe. Warum die Ergebnisse teilweise sehr voneinander abweichen konnte ich nicht herausfinden.

Das Vorgehen, um von einem analogen Formular einen digitalen Klon zu erzeugen, funktioniert grundsätzlich. Allerdings war es auch sehr zeitaufwändig und am Ende frustrierend, da ich nicht nachvollziehen konnte, warum auf einmal die PDFs immer schlechter wurden.

Jetzt ist erstmal Ende meiner Motivation und des Budgets.

Categories
Development Java

PDFBox

Für ein Projekt musste ich ein PDF erzeugen und habe das dann mit PDFBox umgesetzt.

Um mich in die Technik einzuarbeiten habe ich mir ein paar Bilder von Pixabay heruntergeladen, ein Projekt auf GitHub angelegt und dann schrittweise ein PDF mit Bildern erzeugt:

Categories
Development

Maven update versions

In my projects I use Maven as dependency managment system.

In the past I updated versions of libraries manually in pom.xml. But as projects grow, this becomes more and more annoying and time consuming. So I decided to give it a try to do this automatically.

Add Plugins

Add the Enforcer Maven Plugin and the Versions Maven Plugin:

<build>        
  <plugins>
    <plugin>
      <groupId>org.apache.maven.plugins</groupId>
      <artifactId>maven-enforcer-plugin</artifactId>
      <version>3.5.0</version>
      <executions>
        <execution>
          <id>enforce-maven</id>
          <goals>
            <goal>enforce</goal>
          </goals>
          <configuration>
            <rules>
              <requireMavenVersion>
                <version>3.9</version>
              </requireMavenVersion>
            </rules>    
          </configuration>
        </execution>
      </executions>
    </plugin>
    <plugin>
      <groupId>org.codehaus.mojo</groupId>
      <artifactId>versions-maven-plugin</artifactId>
      <version>2.16.2</version>
      <configuration>
        <generateBackupPoms>false</generateBackupPoms>
      </configuration>
    </plugin>
  </plugins>
</build>

Preparation

I could not update the version of the plugins when the version information is hardcoded in the plugin section. So I used properties for the plugin versions.

<properties>
  <enforcer-plugin.version>3.5.0</enforcer-plugin.version>
  <versions-plugin.version>2.16.2</versions-plugin.version>
</properties>

<build>
  <plugins>
    <plugin>
      <groupId>org.apache.maven.plugins</groupId>
      <artifactId>maven-enforcer-plugin</artifactId>
      <version>${enforcer-plugin.version}</version>
      <executions>
        <execution>
          <id>enforce-maven</id>
          <goals>
            <goal>enforce</goal>
          </goals>
          <configuration>
            <rules>
              <requireMavenVersion>
                <version>3.9</version>
              </requireMavenVersion>
            </rules>    
          </configuration>
        </execution>
      </executions>
    </plugin>
    <plugin>
      <groupId>org.codehaus.mojo</groupId>
      <artifactId>versions-maven-plugin</artifactId>
      <version>${versions-plugin.version}</version>
      <configuration>
        <generateBackupPoms>false</generateBackupPoms>
      </configuration>
    </plugin>
  </plugins>
</build>

Check updates

Check for newer versions in properties, dependencies and plugins:

mvn versions:display-property-updates
mvn versions:display-dependency-updates
mvn versions:display-plugin-updates

Update

Update everything:

mvn versions:update-properties
mvn versions:use-latest-releases
Categories
AI Development Java

GPTs with Quarkus

We will use LangChain within Quarkus to connect to some GPTs. Quarkus uses the LangChain4j library.

Quarkus LangChain Extensions

What extensions Quarkus provides?

./mvnw quarkus:list-extensions | grep langchain
[INFO]   quarkus-langchain4j-azure-openai                   LangChain4j Azure OpenAI
[INFO]   quarkus-langchain4j-chroma                         LangChain4j Chroma
[INFO]   quarkus-langchain4j-core                           LangChain4j
[INFO]   quarkus-langchain4j-easy-rag                       LangChain4j Easy RAG
[INFO]   quarkus-langchain4j-hugging-face                   LangChain4j Hugging Face
[INFO]   quarkus-langchain4j-milvus                         LangChain4j Milvus embedding store
[INFO]   quarkus-langchain4j-mistral-ai                     LangChain4j Mistral AI
[INFO]   quarkus-langchain4j-ollama                         LangChain4j Ollama
[INFO]   quarkus-langchain4j-openai                         LangChain4j OpenAI
[INFO]   quarkus-langchain4j-pgvector                       Quarkus LangChain4j pgvector embedding store
[INFO]   quarkus-langchain4j-pinecone                       LangChain4j Pinecone embedding store
[INFO]   quarkus-langchain4j-redis                          LangChain4j Redis embedding store

Chat window

We will reuse our chat window from the last post,

src/main/resources/META-INF/resources/chat.html:

<!DOCTYPE html>
<html lang="en">
<head>
    <meta charset="UTF-8">
    <meta name="viewport" content="width=device-width, initial-scale=1.0">
    <title>WebSocket Chat Example</title>
    <style>
        #chat {
            resize: none;
            overflow: hidden;
            min-width: 70%;
            min-height: 300px;
            max-height: 300px;
            overflow-y: scroll;
        }
        #msg {
            min-width: 40%;
        }
    </style>
</head>
<body>
    <h1>WebSocket Chat Example</h1>
    <p id="message">Connecting...</p>
    <br/>
    <div class="container">
        <br/>
        <div class="row">
            <textarea id="chat"></textarea>
        </div>
        <div class="row">
            <input id="msg" type="text" placeholder="enter your message">
            <button id="send" type="button" disabled>send</button>
        </div>
    
    </div>

    <script src="https://cdnjs.cloudflare.com/ajax/libs/jquery/3.7.1/jquery.min.js"></script>
    <script>
        var connected = false;
        var socket;

        $( document ).ready(function() {
            connect();
            $("#send").click(sendMessage);

            $("#name").keypress(function(event){
                if(event.keyCode == 13 || event.which == 13) {
                    connect();
                }
            });

            $("#msg").keypress(function(event) {
                if(event.keyCode == 13 || event.which == 13) {
                    sendMessage();
                }
            });

            $("#chat").change(function() {
                scrollToBottom();
            });

            $("#name").focus();
        });

        var connect = function() {
            if (! connected) {
                socket = new WebSocket('wss://' + location.host + '/chatsocket');
                socket.onopen = function(m) {
                    connected = true;
                    console.log("Connected to the web socket");
                    $("#send").attr("disabled", false);
                    $("#connect").attr("disabled", true);
                    $("#name").attr("disabled", true);
                    $("#chat").append("[Chatbot] Howdy, how may I help you? \n");
                    $("#msg").focus();
                    $("#message").text('Connected');
                };
                socket.onmessage = function(m) {
                    console.log("Got message: " + m.data);
                    $("#message").text('Received: ' + m.data);
                    $("#chat").append("[Chatbot] " + m.data + "\n");
                    scrollToBottom();
                };
                socket.onclose = function(event) {
                    console.log("Disconnected");
                    $("#message").text('Disconnected');
                    $("#chat").append("[Chatbot] Disconnected" + "\n");
                    scrollToBottom();
                };
                socket.onerror = function(error) {
                    console.log("Error: " + error.message);
                    $("#message").text('Error: ' + error.message);
                    $("#chat").append("[Chatbot] Error: " + error.message + "\n");
                    scrollToBottom();
                };
            }
        };

        var sendMessage = function() {
            if (connected) {
                var value = $("#msg").val();
                console.log("Sending " + value);
                $("#chat").append("[You] " + value + "\n")
                socket.send(value);
                $("#msg").val("");
            }
        };

        var scrollToBottom = function () {
            $('#chat').scrollTop($('#chat')[0].scrollHeight);
        };

    </script>
</body>
</html>
package org.acme;

import io.quarkus.websockets.next.OnTextMessage;
import io.quarkus.websockets.next.WebSocket;
import jakarta.inject.Inject;

@WebSocket(path = "/chatsocket")
public class ChatSocket {
    @Inject
    ChatService chatService;

    @OnTextMessage
    public String onMessage(String userMessage){
        return chatService.chat(userMessage);
    }
}
package org.acme;

import io.quarkus.runtime.StartupEvent;
import jakarta.enterprise.context.ApplicationScoped;
import jakarta.enterprise.event.Observes;

@ApplicationScoped
public class ChatService {
    protected void startup(@Observes StartupEvent event) { 
        System.out.println("Startuuuuuuuuuup event");
    }

    public String chat(String message) {
        return message + " you said.";
    }
}

ChatGPT

Extension

./mvnw quarkus:add-extension -Dextensions='quarkus-langchain4j-openai'

Configuration

quarkus.langchain4j.openai.api-key=<OPEN_API_KEY> 
quarkus.langchain4j.openai.chat-model.model-name=gpt-3.5-turbo

API-Key: You can get an API key from OpenAI. But you need at least to pay 5$, what I did. Alternativley you can use demo as API key for limited testing.

Model-Name: Here are the OpenAI Models. gpt-3.5-turbo is default.
Hint: It is not working, if there is a " "(space/blank) after the model-name.

I had stored my OpenAI-API-key as GitHub secret, so the key is available as environment variable in my Codespace. Therefore I changed the configuration:

quarkus.langchain4j.openai.api-key=${OPEN_API_KEY:demo} 
quarkus.langchain4j.openai.chat-model.model-name=gpt-4o

Code

package org.acme;

import io.quarkiverse.langchain4j.RegisterAiService; 

@RegisterAiService 
public interface Assistant { 
    String chat(String message); 
}

Use this Assistant instead of the ChatService:

package org.acme;

import io.quarkus.websockets.next.OnTextMessage;
import io.quarkus.websockets.next.WebSocket;
import jakarta.inject.Inject;

@WebSocket(path = "/chatsocket")
public class ChatSocket {
    @Inject
    Assistant assistant;

    @OnTextMessage
    public String onMessage(String userMessage){
        return assistant.chat(userMessage);
    }
}

Hugging Face

Extension

./mvnw quarkus:add-extension -Dextensions='quarkus-langchain4j-hugging-face'

Configuration

quarkus.langchain4j.chat-model.provider=huggingface

quarkus.langchain4j.huggingface.api-key=${HUGGINGFACE_API_KEY:nokey}
quarkus.langchain4j.huggingface.chat-model.model-id=KingNish/OpenGPT-4o

Provider: Now we have two models configured, we need to specify which provider to use (huggingface)

API-Key: Get free API-Key from Hugging Face:
Login -> Settings -> Access Tokens -> Generate (Type: 'Read')

Model: Search on the Hugging Face website, I randomly took KingNish/OpenGPT-4o

Code

No code change needed, it works with the same code as for ChatGPT.

Everything is changed by configuration.

Antrophic Claude

Extension

./mvnw quarkus:add-extension -Dextensions='quarkus-langchain4j-anthropic'

[ERROR] ❗  Nothing installed because keyword(s) 'quarkus-langchain4j-anthropic' were not matched in the catalog.

It did not work with the maven executable. Need to add dependency manually to pom.xml, see documentation:

<dependency>
    <groupId>io.quarkiverse.langchain4j</groupId>
    <artifactId>quarkus-langchain4j-anthropic</artifactId>
    <version>0.15.1</version>
</dependency>

Configuration

quarkus.langchain4j.chat-model.provider=anthropic

quarkus.langchain4j.anthropic.api-key=${ANTHROPIC_API_KEY:no key}
quarkus.langchain4j.anthropic.chat-model.model-name=claude-3-haiku-20240307

API-Key: Login to Antropic Console and get an API key for free.

Model: Select one from documentation.

Code

No code change needed, it works with the same code as for ChatGPT.

But did not work:

org.jboss.resteasy.reactive.ClientWebApplicationException: Received: 'Bad Request, status code 400' when invoking: Rest Client method: 'io.quarkiverse.langchain4j.anthropic.AnthropicRestApi#createMessage'

Quarkus terminal logging

Without API-key I got a status code 401.

Ollama

Prerequisites

Ollama has to be installed. See this post or Ollama Homepage.

curl -fsSL https://ollama.com/install.sh | sh
export OLLAMA_HOST=0.0.0.0:11434
ollama serve
ollama pull moondream

ollama --version
ollama version is 0.1.41

Extension

./mvnw quarkus:add-extension -Dextensions='quarkus-langchain4j-ollama'

Configuration

quarkus.langchain4j.chat-model.provider=ollama

quarkus.langchain4j.ollama.chat-model.model-id=moondream
quarkus.langchain4j.ollama.timeout=120s

Model: I choose moondream, because it is the smallest one (829MB).

Models can be found on the GitHub page or on Ollama library.

However, Quarkus is ignoring my resourcefriendly choice, as I can see in the Logs: "Preloading model llama3" 🤷‍♂️
UPDATE: For Ollama it is model-id, not model-name!

Code

Also no change.

Mistral

Extension

./mvnw quarkus:add-extension -Dextensions='quarkus-langchain4j-mistral'

Configuration

quarkus.langchain4j.chat-model.provider=mistralai

quarkus.langchain4j.mistralai.api-key=${MISTRALAI_API_KEY:no key}
quarkus.langchain4j.mistralai.chat-model.model-name=mistral-tiny

API-key: You can generate an API-key in Mistral AI Console. But you are required to have a Abonnement, which I do not have. Therefore nor API-key for me.

Model: mistral-tiny is default one

Code

Also no change.

But could not test, because I do not have an API-key.

Groq

I like Groq but unfortunately there is no LangChain4j support yet.

The Python LangChain project has already implemented Groq.

Categories
Development Java

Quarkus in Codespace

Set up Quarkus in Codespace environment

Setup

Create a repository “workshop”:

Open codespace and setup Linux in Terminal:

sudo apt update && \
sudo apt upgrade -y && \
sudo apt install httpie -y

Setup Quarkus Project

Quarkus Homepage

Getting started → 4. Bootstrapping the project → Maven

copy and change ArtifactId to workshop

cd ..
# pwd -> /workspaces
mvn io.quarkus.platform:quarkus-maven-plugin:3.10.2:create \
    -DprojectGroupId=org.acme \
    -DprojectArtifactId=workshop

We can not just delete the workshop folder, because GIT information are inside this folder.

Workaround:

cd /workspaces/workshop/

mvn io.quarkus.platform:quarkus-maven-plugin:3.10.2:create \
    -DprojectGroupId=org.acme \
    -DprojectArtifactId=workshop

mv workshop/* .
ls -lisah workshop/
# hidden files/directory still there
mv workshop/.* .
ls -lisah workshop/
# now everthing has moved
rmdir workshop

Stage, commit and push to repository:

Open GreetingResource, this will force Visual Code to ask to install Extension Pack for Java:

Go to Explorer → Java Projects → Import Projects

It takes a minute or two to show our workshop project:

Start Quarkus

./mvnw quarkus:dev

In Ports Port 5005 is automatically added, but not Port 8080.

We need to add Port 8080 manually.

Click on the Globus Icon and Quarkus welcome page opens:

Go to Visit the dev UI → Endpoints

Click on /hello:

Test from terminal

Open new Terminal

## "&& echo" for additional linebreak
curl localhost:8080/hello && echo
http localhost:8080/hello

WebSockets with Quarkus

Quarkus Guide for using WebSockets

Setup ChatSocket

First we need to install extensions:

./mvnw quarkus:add-extension -Dextensions='websockets'
./mvnw quarkus:add-extension -Dextensions='websockets-next'

Create simple ChatSocket:

package org.acme;

import io.quarkus.websockets.next.OnTextMessage;
import io.quarkus.websockets.next.WebSocket;

@WebSocket(path = "/chatsocket")
public class ChatSocket {
    @OnTextMessage
    public String onMessage(String userMessage){
        return "You said: " + userMessage;
    }
}

Test from terminal

npm install -g wscat
wscat -c ws://localhost:8080/chatsocket

wscat -c ws://localhost:8080/chatsocket
> Hello World!
< You said: Hello World!

Build html client

mkdir -p src/main/resources/META-INF/resources
touch src/main/resources/META-INF/resources/chat.html
<!DOCTYPE html>
<html lang="en">
<head>
    <meta charset="UTF-8">
    <meta name="viewport" content="width=device-width, initial-scale=1.0">
    <title>WebSocket Chat Example</title>
    <style>
        #chat {
            resize: none;
            overflow: hidden;
            min-width: 70%;
            min-height: 300px;
            max-height: 300px;
            overflow-y: scroll;
        }
        #msg {
            min-width: 40%;
        }
    </style>
</head>
<body>
    <h1>WebSocket Chat Example</h1>
    <p id="message">Connecting...</p>
    <br/>
    <div class="container">
        <br/>
        <div class="row">
            <textarea id="chat"></textarea>
        </div>
        <div class="row">
            <input id="msg" type="text" placeholder="enter your message">
            <button id="send" type="button" disabled>send</button>
        </div>
    
    </div>

    <script src="https://cdnjs.cloudflare.com/ajax/libs/jquery/3.7.1/jquery.min.js"></script>
    <script>
        var connected = false;
        var socket;

        $( document ).ready(function() {
            connect();
            $("#send").click(sendMessage);

            $("#name").keypress(function(event){
                if(event.keyCode == 13 || event.which == 13) {
                    connect();
                }
            });

            $("#msg").keypress(function(event) {
                if(event.keyCode == 13 || event.which == 13) {
                    sendMessage();
                }
            });

            $("#chat").change(function() {
                scrollToBottom();
            });

            $("#name").focus();
        });

        var connect = function() {
            if (! connected) {
                socket = new WebSocket('wss://' + location.host + '/chatsocket');
                socket.onopen = function(m) {
                    connected = true;
                    console.log("Connected to the web socket");
                    $("#send").attr("disabled", false);
                    $("#connect").attr("disabled", true);
                    $("#name").attr("disabled", true);
                    $("#chat").append("[Chatbot] Howdy, how may I help you? \n");
                    $("#msg").focus();
                    $("#message").text('Connected');
                };
                socket.onmessage = function(m) {
                    console.log("Got message: " + m.data);
                    $("#message").text('Received: ' + m.data);
                    $("#chat").append("[Chatbot] " + m.data + "\n");
                    scrollToBottom();
                };
                socket.onclose = function(event) {
                    console.log("Disconnected");
                    $("#message").text('Disconnected');
                    $("#chat").append("[Chatbot] Disconnected" + "\n");
                    scrollToBottom();
                };
                socket.onerror = function(error) {
                    console.log("Error: " + error.message);
                    $("#message").text('Error: ' + error.message);
                    $("#chat").append("[Chatbot] Error: " + error.message + "\n");
                    scrollToBottom();
                };
            }
        };

        var sendMessage = function() {
            if (connected) {
                var value = $("#msg").val();
                console.log("Sending " + value);
                $("#chat").append("[You] " + value + "\n")
                socket.send(value);
                $("#msg").val("");
            }
        };

        var scrollToBottom = function () {
            $('#chat').scrollTop($('#chat')[0].scrollHeight);
        };

    </script>
</body>
</html>

CONTEXTS AND DEPENDENCY INJECTION Example

Add a ChatService for the 'logic' and inject it into the Chat Socket:

package org.acme;

import io.quarkus.runtime.StartupEvent;
import jakarta.enterprise.context.ApplicationScoped;
import jakarta.enterprise.event.Observes;

@ApplicationScoped
public class ChatService {
    protected void startup(@Observes StartupEvent event) { 
        System.out.println("Startuuuuuuuuuup event");
    }

    public String chat(String message) {
        return message + " you said.";
    }
}
package org.acme;

import io.quarkus.websockets.next.OnTextMessage;
import io.quarkus.websockets.next.WebSocket;
import jakarta.inject.Inject;

@WebSocket(path = "/chatsocket")
public class ChatSocket {
    @Inject
    ChatService chatService;

    @OnTextMessage
    public String onMessage(String userMessage){
        return chatService.chat(userMessage);
    }
}

Build and run native Image

Building a Native Executable - Quarkus

Build:

# Ich muss vermutlich nur den zweiten Befehl ausführen?
# ./mvnw install -Dnative 
./mvnw package -Dnative -Dquarkus.native.container-build=true -Dquarkus.container-image.build=true

Open another terminal and see how much codespace machine is sweating:

htop

Run:

target/workshop-1.0.0-SNAPSHOT-runner

The project generation has provided a Dockerfile.native-micro in the src/main/docker directory.

# build
docker build -f src/main/docker/Dockerfile.native-micro -t deringo/workshop .

# run
docker run -i --rm -p 8080:8080 deringo/workshop
Categories
Development

WebSockets with Node.js

WebSockets are a protocol that provides full-duplex communication channels over a single, long-lived connection. They are designed for real-time, event-driven web applications and allow for low-latency communication between a client (typically a web browser) and a server. Here are some key points about WebSockets:

  1. Full-Duplex Communication: Unlike HTTP, which is request-response based, WebSockets allow for two-way communication where both client and server can send and receive messages independently of each other.
  2. Persistent Connection: WebSocket connections are persistent, meaning they remain open as long as both the client and server agree to keep the connection alive. This reduces the overhead associated with establishing new connections.
  3. Low Latency: WebSockets are ideal for scenarios requiring real-time updates because they reduce the latency associated with polling or long-polling techniques.
  4. Protocol: WebSockets are established by upgrading an HTTP/HTTPS connection using a WebSocket handshake, switching the protocol from HTTP to WebSocket.
  5. Use Cases: Common use cases include live chat applications, real-time notifications, collaborative editing, online gaming, and any application requiring real-time data updates.

Node.js in Codespace

I want to test WebSockets with Node.js in GitHub Codespace.

Node Version Manager (nvm)

# test installation
command -v nvm
nvm


# check version
nvm ls
       v18.20.1
       v20.12.1
->       system
default -> 20 (-> v20.12.1)
iojs -> N/A (default)
unstable -> N/A (default)
node -> stable (-> v20.12.1) (default)
stable -> 20.12 (-> v20.12.1) (default)
lts/* -> lts/iron (-> v20.12.1)
lts/argon -> v4.9.1 (-> N/A)
lts/boron -> v6.17.1 (-> N/A)
lts/carbon -> v8.17.0 (-> N/A)
lts/dubnium -> v10.24.1 (-> N/A)
lts/erbium -> v12.22.12 (-> N/A)
lts/fermium -> v14.21.3 (-> N/A)
lts/gallium -> v16.20.2 (-> N/A)
lts/hydrogen -> v18.20.1
lts/iron -> v20.12.1


# check node version
node --version
v20.12.1

Node.js

# install LTS
nvm install --lts
Installing latest LTS version.
Now using node v20.14.0 (npm v10.7.0)


# check version
nvm ls


# check node version
node --version
v20.14.0

Some npm commands

# Show installed Nodes
nvm ls
# Show available versions
nvm ls-remote
# Install latest version
nvm install node
# Install LTS version
nvm install --lts
# Install a specific version (list available -> example 16.20.2)
nvm install 16.20.2
# Use a specific version
nvm use 16.20.2
# Show npm version
npm --version

Simple Website with Node.js

To serve an HTML page using Node.js, we can use the built-in http module.

Create an HTML file

<!DOCTYPE html>
<html lang="en">
<head>
    <meta charset="UTF-8">
    <meta name="viewport" content="width=device-width, initial-scale=1.0">
    <title>Node.js HTML Server</title>
</head>
<body>
    <h1>Hello, World!</h1>
    <p>This is a simple HTML page served by Node.js.</p>
</body>
</html>

Create a Node.js script to serve the HTML file

const http = require('http');
const fs = require('fs');
const path = require('path');

const hostname = '127.0.0.1';
const port = 3000;

const server = http.createServer((req, res) => {
    if (req.method === 'GET' && req.url === '/') {
        const filePath = path.join(__dirname, 'index.html');
        fs.readFile(filePath, (err, data) => {
            if (err) {
                res.statusCode = 500;
                res.setHeader('Content-Type', 'text/plain');
                res.end('Internal Server Error');
            } else {
                res.statusCode = 200;
                res.setHeader('Content-Type', 'text/html');
                res.end(data);
            }
        });
    } else {
        res.statusCode = 404;
        res.setHeader('Content-Type', 'text/plain');
        res.end('Not Found');
    }
});

server.listen(port, hostname, () => {
    console.log(`Server running at http://${hostname}:${port}/`);
});

Run the Node.js server

node server.js

Test Node.js server in terminal

curl localhost:3000
http localhost:3000

Test Node.js server in browser

WebSocket in Codespace

To create a Node.js server that provides both an HTTP server for serving an HTML page and a WebSocket server for real-time communication, we can use the ws library for WebSockets.

Install the ws library

npm install ws

Create the HTML file

<!DOCTYPE html>
<html lang="en">
<head>
    <meta charset="UTF-8">
    <meta name="viewport" content="width=device-width, initial-scale=1.0">
    <title>WebSocket Example</title>
</head>
<body>
    <h1>WebSocket Example</h1>
    <p id="message">Connecting...</p>
    <script>
        const socket = new WebSocket('ws://localhost:3000');

        socket.onopen = function(event) {
            document.getElementById('message').innerText = 'Connected';
            socket.send('Hello Server');
        };

        socket.onmessage = function(event) {
            document.getElementById('message').innerText = 'Received: ' + event.data;
        };

        socket.onclose = function(event) {
            document.getElementById('message').innerText = 'Disconnected';
        };

        socket.onerror = function(error) {
            document.getElementById('message').innerText = 'Error: ' + error.message;
        };
    </script>
</body>
</html>

Create the Node.js server

const http = require('http');
const fs = require('fs');
const path = require('path');
const WebSocket = require('ws');

const hostname = '127.0.0.1';
const port = 3000;

// Create HTTP server
const server = http.createServer((req, res) => {
    if (req.method === 'GET' && req.url === '/') {
        const filePath = path.join(__dirname, 'index.html');
        fs.readFile(filePath, (err, data) => {
            if (err) {
                res.statusCode = 500;
                res.setHeader('Content-Type', 'text/plain');
                res.end('Internal Server Error');
            } else {
                res.statusCode = 200;
                res.setHeader('Content-Type', 'text/html');
                res.end(data);
            }
        });
    } else {
        res.statusCode = 404;
        res.setHeader('Content-Type', 'text/plain');
        res.end('Not Found');
    }
});

// Create WebSocket server
const wss = new WebSocket.Server({ server });

wss.on('connection', ws => {
    console.log('Client connected');

    ws.on('message', message => {
        console.log(`Received: ${message}`);
        ws.send('Hello Client');
    });

    ws.on('close', () => {
        console.log('Client disconnected');
    });
});

server.listen(port, hostname, () => {
    console.log(`Server running at http://${hostname}:${port}/`);
});

Run the Node.js server

node server.js

Test Node.js server in terminal

curl localhost:3000
http localhost:3000

Test Node.js server in browser

Brower Fix

We need to adjust the address of the WebSocket.

When setting up a WebSocket connection from the client-side script within the HTML file, the WebSocket URL must match the address and port where the WebSocket server is running. This URL should include the WebSocket protocol (ws:// or wss:// for secure connections)

Adjustment:

const socket = new WebSocket('wss://symmetrical-disco-g454xqrq9pqvfw6pr-3000.app.github.dev/:3000');

OK, this works, so make it a little more dynamic:

const socket = new WebSocket('wss://' + location.host + '/:3000');

Test WebSocket from terminal

Unfortunately, curl and httpie do not natively support WebSocket protocols. To test WebSocket connections using command-line we can use wscat, which is specifically designed for WebSocket communication.

npm install -g wscat

Using wscat to Test WebSocket Connections:

wscat -c ws://localhost:3000

Connected (press CTRL+C to quit)
> hello
< Hello Client

Build a Chat App

Let's build a "Chat App"

Server

We enhance the server to dynamically answer to a message:

[...]
     ws.on('message', message => {
        console.log(`Received: ${message}`);
        ws.send('Hello ' + message);
    });
[...]

Amazing!

Client

<!DOCTYPE html>
<html lang="en">
<head>
    <meta charset="UTF-8">
    <meta name="viewport" content="width=device-width, initial-scale=1.0">
    <title>WebSocket Chat Example</title>
    <style>
        #chat {
            resize: none;
            overflow: hidden;
            min-width: 70%;
            min-height: 300px;
            max-height: 300px;
            overflow-y: scroll;
        }
        #msg {
            min-width: 40%;
        }
    </style>
</head>
<body>
    <h1>WebSocket Chat Example</h1>
    <p id="message">Connecting...</p>
    <br/>
    <div class="container">
        <br/>
        <div class="row">
            <textarea id="chat"></textarea>
        </div>
        <div class="row">
            <input id="msg" type="text" placeholder="enter your message">
            <button id="send" type="button" disabled>send</button>
        </div>
    
    </div>

    <script src="https://cdnjs.cloudflare.com/ajax/libs/jquery/3.7.1/jquery.min.js"></script>
    <script>
        var connected = false;
        var socket;

        $( document ).ready(function() {
            connect();
            $("#send").click(sendMessage);

            $("#name").keypress(function(event){
                if(event.keyCode == 13 || event.which == 13) {
                    connect();
                }
            });

            $("#msg").keypress(function(event) {
                if(event.keyCode == 13 || event.which == 13) {
                    sendMessage();
                }
            });

            $("#chat").change(function() {
                scrollToBottom();
            });

            $("#name").focus();
        });

        var connect = function() {
            if (! connected) {
                socket = new WebSocket('wss://' + location.host + '/:3000');
                socket.onopen = function(m) {
                    connected = true;
                    console.log("Connected to the web socket");
                    $("#send").attr("disabled", false);
                    $("#connect").attr("disabled", true);
                    $("#name").attr("disabled", true);
                    $("#chat").append("[Chatbot] Howdy, how may I help you? \n");
                    $("#msg").focus();
                    $("#message").text('Connected');
                };
                socket.onmessage = function(m) {
                    console.log("Got message: " + m.data);
                    $("#message").text('Received: ' + m.data);
                    $("#chat").append("[Chatbot] " + m.data + "\n");
                    scrollToBottom();
                };
                socket.onclose = function(event) {
                    console.log("Disconnected");
                    $("#message").text('Disconnected');
                    $("#chat").append("[Chatbot] Disconnected" + "\n");
                    scrollToBottom();
                };
                socket.onerror = function(error) {
                    console.log("Error: " + error.message);
                    $("#message").text('Error: ' + error.message);
                    $("#chat").append("[Chatbot] Error: " + error.message + "\n");
                    scrollToBottom();
                };
            }
        };

        var sendMessage = function() {
            if (connected) {
                var value = $("#msg").val();
                console.log("Sending " + value);
                $("#chat").append("[You] " + value + "\n")
                socket.send(value);
                $("#msg").val("");
            }
        };

        var scrollToBottom = function () {
            $('#chat').scrollTop($('#chat')[0].scrollHeight);
        };

    </script>
</body>
</html>

Awesome!

Also 'Chatbot' is working from terminal:

Categories
Development Java Linux

GitHub Codespace

I was on JCON 2024 and beside other interesting talks I heard one talk about cloud-based IDEs, and I wanted to try out, if GitHub Codespaces could work for me.

Explore the evolving landscape of cloud-based integrated development environments (IDEs), focusing on Gitpod, GitHub codespaces and Devpod. Compare and contrast these cloud IDEs with traditional counterparts, emphasizing the role of container technology, specifically the devcontainer specification. The discussion includes advances, existing limitations, and the potential for developing polyglot, container-based distributed applications. A live demo illustrates the rapid setup and coding process across various languages and frameworks, showcasing testing capabilities and seamless deployment to Kubernetes. Discover how custom additions enhance flexibility. Additionally, uncover the impact of cloud IDEs on teaching and team projects, ensuring consistent development setups for enhanced efficiency and streamlined processes.

[EN] Codespaces, Gitpod, Devpod ... what cloud and container-based IDEs can do for you
by Matthias Haeussler (Novatec Consulting GmbH)

Create GitHub Account

Go to GitHub and create an account. Free plan is suitable.

Create Repository

Create a new repository with name “workshop”. Add a README file.

Create Codespace

TODO: funktioniert das GIF?

Change Keyboard Layout to German: In the lower right corner click on “Layout: US” and enter “German” in the upcoming window.

TODO: Ich hätte gerne die Sprache von Visual Code auf Englisch umgestellt. Wie?

Work in the Terminal

Copy & Paste

Type something into the terminal.
Mark it with your mouse.
One Right Click to copy into Clipboard.
Another Right Click to paste from Clipboard.

Timezone

Set Timzone to Europe -> Berlin

sudo dpkg-reconfigure tzdata

Internet

Do we have access to the Internet? Let’s try with curl:

curl google.com

HTTPie

A modern alternative to curl is HTTPie:

Install httpie:

sudo apt update && \
sudo apt upgrade -y && \
sudo apt install httpie -y

This will take a few minutes. Meanwhile we can work in another Terminal window. Later we come back and test HTTPie:

http google.com

Additional Terminal window

Open a second Terminal with bash:

VIM

ls -lisah
touch test.sh
ls -lisah
vim test.sh
chmod +x test.sh
./test.sh
name=Ingo
echo "My name is $name"
echo "But here I am: $(whoami)"

Python

Do we have Python in our Codespace? Which version(s)?

python3 --version
python --version
vim hello_world.py
python hello_world.py
# Print "Hello World" to the console 
print("Hello World") 

Docker

docker --version
docker-compose --version
docker run hello-world 

Apache HTTPD

docker run -p 8888:80 httpd

Open in Browser:

Find all open Ports in the Ports-Tab:

Normally Port 8888 should be listed here.
We need to add Port, just enter 8888:

Open Website just with a click on the Globus-Icon.

When we try to open the address in another browser, we will see a GitHub-Login.
When we login with another GitHub-Account, we will get a 404-error. Because the page is Private.
Switch to Public:

Now we can access the page in another brower.

At the end we can shutdown HTTPD with <STRG>+<C> in Terminal window. It should automatically disapear in the Ports-Tab. If not, you can remove it manually.

Microsoft Edge - Caching problem

Open the Public page in MS Edge.
Make the page Private again. Try to open in a new browser, won’t work.
Reload (the Public loaded) page in MS Edge: You can still see the site!
This is a cached version and we need to force MS Edge to reload from server.

Open Developer Tools (F12 or <STRG>+<SHIFT>+<I>), then you can Right Click on the reload button to have additional options:

Java

java --version
vim HelloWorld.java
javac HelloWorld.java
java HelloWorld
rm -f HelloWorld*
class HelloWorld { 
  public static void main(String args[]) { 
      System.out.println("Hello World"); 
  } 
}

Run Java Source as Shell Scripts

type -a java
# java is /home/codespace/java/current/bin/java
# java is /usr/local/sdkman/candidates/java/current/bin/java

vim HelloWorld.sh
chmod +x HelloWorld.sh
./HelloWorld.sh
rm HelloWorld.sh
#!/home/codespace/java/current/bin/java --source 21 

class HelloWorld { 
  public static void main(String args[]) { 
      System.out.println("Hello World"); 
  } 
}

Maven

Start

We create a new pom.xml from scratch.
We need a template. We will take “The Basics”-one from the Apache Maven POM Reference page.

    <project xmlns="http://maven.apache.org/POM/4.0.0" xmlns:xsi="http://www.w3.org/2001/XMLSchema-instance"
      xsi:schemaLocation="http://maven.apache.org/POM/4.0.0 https://maven.apache.org/xsd/maven-4.0.0.xsd">
      <modelVersion>4.0.0</modelVersion>
     
      <groupId>org.codehaus.mojo</groupId>
      <artifactId>my-project</artifactId>
      <version>1.0</version>
    </project>
mvn --version
vim pom.xml
mvn clean verify 

Sample Project

Open pom.xml in Explorer (GUI) and change:

  • org.codehaus.mojo to org.acme
  • my-project to workshop

No need to save: Changes are automatically saved

To doublecheck that everything is still ok run mvn clean verify  again.

mkdir -p src/main/java/org/acme
touch src/main/java/org/acme/HelloWorld.java 

Open HelloWorld.java with <STRG>+<MOUSECLICK> in GUI-Editor.

Install Extension Pack for Java as suggested:

And also the next two suggestions:

package org.acme;

class HelloWorld { 
  public static void main(String args[]) { 
      System.out.println("Hello World"); 
  } 
}
mvn package
java -classpath ./target/workshop-1.0.jar org.acme.HelloWorld

Maven - different version

In our Codespace we have Maven 3.9.6 and Java 21.
Let’s test with a different version. We will use Docker.

Official Maven Image on DockerHub.

We want to re-use the local Maven Cache. Let’s find out where it is:

sudo apt install locate -y
sudo updatedb
locate .m2
# /home/codespace/.m2

Adjust the “How to use this image” command:

docker run -it --rm \
--name workshop-maven-project \
-v /home/codespace/.m2:/root/.m2 \
-v "$(pwd)":/usr/src/workshop \
-w /usr/src/workshop \
maven:3.3-jdk-8 \
mvn clean package
java -classpath ./target/workshop-1.0.jar org.acme.HelloWorld

Sourcecode management

We have 7 uncommited changes, but only 2 files should go into the repository:

What we need is a .gitignore file.

touch .gitignore

There are two template files we will copy:

Now there are only 3 files we can commit:

Now we can see these files in our repository:

Secrets

Use GitHub Secrets for API-keys etc.

In the upper-right corner of any page, click your profile photo, then click Settings. Under Codespaces we can set our secrets:

In our Codespace we can access the secret as environment variable:

A running codespace has to be restarted!

Cleanup

Delete all files:

rm -rf target && \
rm -rf src && \
rm pom.xml && \
rm README.md && \
rm .gitignore

Stage & commit changes:

Now we have a clean repository:

Close browser window with codespace and delete the codespace:

Delete the repository:

Go to Settings → General → Danger Zone → Delete this repository

Categories
Database Development Java

DBF Datei

Die Sourcen des DBFSample finden sich wie immer im GitHub.

Das DBFSample ist ein PoC um eine DBF Datei mit Java verarbeiten zu können.

Im Projekt haben wir einige DBF Dateien erhalten, deren Daten wir importieren/verarbeiten müssen. Das soll nicht meine Aufgabe sein, aber ich möchte für den Fall vorbereitet sein, dass ich dabei unterstützen darf.

Ich brauche also erstmal nur verstehen, was eine DBF Datei ist und wie ich grundlegend damit arbeiten kann.

Was ist eine DBF Datei

Eine DBF-Datei ist eine Standarddatenbankdatei, die von dBASE, einer Datenbankverwaltungssystemanwendung, verwendet wird.
Es organisiert Daten in mehreren Datensätzen mit Feldern, die in einem Array-Datentyp gespeichert sind.

Aufgrund der frühzeitigen Einführung in der Datenbank und einer relativ einfachen Dateistruktur wurden DBF-Dateien allgemein als Standardspeicherformat für strukturierte Daten in kommerziellen Anwendungen akzeptiert.

https://datei.wiki/extension/dbf

Wie kann ich eine DBF Datei öffnen?

DBeaver

Da es sich um ein Datenbankformat handelt und ich grade das Tool DBeaver in meinen Arbeitsalltag eingeführt habe, lag es für mich nahe, die Datei mit DBeaver zu öffnen.

Dazu musste ich einen Treiber zu DBeaver hinzufügen um anschließend die Datei öffnen zu können. Ich konnte dann die Tabellenstruktur sehen, aber nicht auf die Tabelle zugreifen. Es gab eine Fehlermeldung, dass eine weitere Datei fehlen würde.

java.sql.SQLException: nl.knaw.dans.common.dbflib.CorruptedTableException: Could not find file 'C:\dev\tmp\adress.dbt' (or multiple matches for the file)

DBeaver Stack-Trace

Diese andere Datei gibt es nicht und sie ist auch nicht für den Zugriff erforderlich, wie der erfolgreiche Zugriff über die anderen Wege beweist.

Etwas ausführlicher hatte ich es im Artikel zu DBeaver geschrieben.

Excel

Excel öffnen, DBF Datei reinziehen, Daten ansehen. Fertig, so einfach kann es gehen.

Ich hatte mich allerdings durch die Bezeichnung Standarddatenbankdatei ablenken lassen, so dass ich zuerst die Wege über DBeaver und Java versucht hatte.

Java

Für den Zugriff mit Java habe ich die Bibliothek JavaDBF verwendet.

Die beiden Testklassen JavaDBFReaderTest und JavaDBFReaderWithFieldNamesTest waren schnell angepasst und eine weiter Klasse zum Auslesen aller Daten ReadItAll war dann auch problemlos möglich. Dabei ignoriere ich die Datentypen und lese einfach alles als Strings ein. Für den PoC reicht das.

DBF in PostgresDB speichern

Als Beispiel, wie ich mit den Daten weiterarbeiten kann, importiere ich sie in eine Postgres Datenbank.

Dazu lese ich zuerst die sample.dbf ein und erzeuge dann eine Tabelle sample mit allen Columns, die in sample.dbf vorhanden sind. Anschließend wird die Tabelle zeilenweise gefüllt.

Das meiste ist hardcodiert und die Spalten sind alles Text-Spalten, da ich die Datentypen aus der DBF Datei nicht auslese, aber für den PoC reicht das.

Categories
Development Linux

Docker Logs lesen

Problem

Der Server wird gestartet mit:

sudo docker-compose up --detach

Dadurch werden die Logfiles mit dem User root geschrieben und ich kann sie mit meinem User ingo nicht lesen.

Auf der Console kann ich das leicht mit einem vorangestellten sudo lösen, aber um mal eben schnell in die Logfiles rein zu schauen würde ich gerne mein graphisches Tool WinSCP verwenden

Lösung

Man kann Docker / Docker Compose mit einem User starten und mit dem würden dann vermutlich auch die Logfiles geschrieben werden.
Als ich das mit einem Tomcat Image getestet hatte, ist es daran gescheitert, dass mit meinem User ingo auf bestimmte Verzeichnisse im Container nicht zugegriffen werden konnte.

Gelöst habe ich es dann so, dass ich nicht den User, oder User und Gruppe, gesetzt habe, sondern nur die Gruppe.
So wird mit dem root User gearbeitet, die Dateien gehören dem User root und für die gesetzte Gruppe sind sie lesbar.
Mein User muss natürlich ebenfalls in der Gruppe sein.

Gruppe anlegen:

sudo groupadd -g 1001 logfilegroup

Die Group ID ist relativ willkürlich gesetzt. Eigentlich hatte ich groupadd ohne das -g Flag aufgerufen und dann mit cat /etc/group die Group ID rausgesucht. Hier wollte ich das Statement mit explizitem setzen der Group ID hinschreiben, da ich es auch im Projekt verwendet hatte, um auf jedem Server die selbe Group ID zu haben.

User der Gruppe hinzufügen:

sudo usermod --append --groups logfilegroup ingo

Mit den Befehlen groups oder id kann man die Gruppen seines Users sehen, die neue logfilegroup wird aber erst in einer neuen Shell hinzugefügt. Also entweder die Shell schließen und neu öffnen, oder mit su ingo weiter arbeiten.

ingo$ sudo usermod --append --groups logfilegroup ingo
ingo$ groups
ingo adm
ingo$ su ingo
Password:
ingo$ groups
ingo adm logfilegroup

Docker Compose File:

Im Docker Compose File muss die Group ID gesetzt werden, mit dem Namen der Gruppe geht es nicht.

version: "3.2"
services:
  melba-web:
    image: tomcat:10.1.18-jre21 # https://hub.docker.com/_/tomcat
    restart: always
    container_name: myapp-tomcat
    user: :1001
    ports: 
      - "8080:8080"
    environment:
      - _JAVA_OPTIONS=-Duser.language=de -Duser.country=DE
    volumes:
      - ./log/tomcat:/usr/local/tomcat/logs
sudo docker-compose up --detach

ls -lisah log/tomcat/*
4211764 4.0K drwxr-xr-x 2 ingo ingo  4.0K Feb  8 16:52 .
4211762 4.0K drwxr-xr-x 4 ingo ingo  4.0K Feb  5 16:42 ..
4205212  24K -rw-r----- 1 root logfilegroup  24K Feb  8 16:21 catalina.2024-02-08.log
4211758  28K -rw-r----- 1 root logfilegroup  24K Feb  8 16:58 localhost_access_log.2024-02-08.txt
Categories
Database Development

DBeaver

Bisher hatte ich auf meine Postgres Datenbank per PG-Admin zugegriffen.

Ein Kollege hat mir heute DBeaver als Datenbanktool empfohlen.

Installation

Die Installation der DBeaver Community Version war in meinem Fall einfach das ZIP-File herunterladen, und nach C:\Program Files\dbeaver entpacken.

DBeaver erscheint in deutscher Lokalisation. Da aber die meisten Artikel über DBeaver auf Englisch sind, stelle ich auf Englisch um.
Dazu auf Fenster -> Einstellungen gehen und im User Interface die Regional settings anpassen:

Im Unterpunkt User Interface -> Appearance stelle ich testweise das Theme auf Dark.

Meine Postgres Datenbank konnte ich mit den Verbindungsparametern anbinden, benötigte Treiber konnte DBeaver selbst nachladen.

CSV Export

Für den CSV Export im Result-Tab auf "Ergebnis exportieren" klicken:

In den Format settings noch das Spaltentrennzeichen auf ";" für mein deutsches Excel ändern:

Im Ausgabetab den Ausgabeordner und Dateinamen, ohne Endung .csv, eingeben, Encoding auf UTF-8 belassen:

Trotz UTF-8 zeigt Excel die Umlaute nicht richtig an:

Die Ursache / Lösung konnte ich auf die Schnelle nicht finden. Zum Glück ist das grade nicht so wichtig, daher kann ich die Recherche vertragen.

dBase

Ich habe eine .dbf-Datei erhalten. Dabei handelt es sich anscheinend um einen dBase-Datenbank-Export. Diese Datei/Datenbank möchte ich mir mit DBeaver ansehen.

Dazu muss ich zuerst einen JDBC-Driver herunterladen. Nach kurzer Suche habe ich dieses Maven-Dependency gefunden, die ich in mein Maven Repository herunterlade:

<dependency>
    <groupId>com.wisecoders</groupId>
    <artifactId>dbf-jdbc-driver</artifactId>
    <version>1.1.2</version>
</dependency>

Um den Treiber zu DBeaver hinzuzufügen auf Database -> Driver Manager gehen:

und da mir das im Driver Manager zu viele Einstellungen waren, habe ich das erstmal gelassen und erstmal einen anderen Ansatz probiert:

Ein Kommentar auf Stack Overflow beschreibt es so:

  • download dans-dbf-lib-1.0.0-beta-10.jar (e.g. from sourceforge)
  • in Drivers location, Local folder (in Windows: C:\Users\user\AppData\Roaming\DBeaverData\drivers) create the \drivers\dbf directory. NB 'drivers' must be created under drivers, so ...\DBeaverData\drivers\drivers\...
  • put dans-dbf-lib-1.0.0-beta-10.jar in this folder
  • now you can create a new connection using the Embedded/DBF driver

Connection anlegen:

Im Database Navigator:

DBF Database auswählen:

Wenn ich dann aber in die Treiber Details schaue, sieht es nicht so aus, als ob das DANS DBF Driver ist:

Andererseits erscheint das jar dann doch bei den Libraries, also sollte das doch richtig sein?

Ich gebe den Pfad zum Ordner mit der .dbf Datei an und rufe Test Connection auf, was sogar funktioniert:

Mit Finish beenden.

Im Database Navigator erscheint die ".dbf Datenbank" und ich kann die enthaltene Tabelle mit ihren Spalten erkennen. Wenn ich dann allerdings View Data auf der Tabelle aufrufe gibt es eine Fehlermeldung:

SQL Error: nl.knaw.dans.common.dbflib.CorruptedTableException: Could not find file 'C:\dev\tmp\SHImport\adress.dbt' (or multiple matches for the file)

Möglicherweise habe ich keinen ordentlichen Export bekommen?

Ich werde dem nachgehen und wenn es noch relevante Informationen zum DBeaver Import geben sollte werde ich diese hier anfügen.