Categories
AWS Development

Domainname für EC2

Auf die zuvor erstellten EC2 Instanz soll ein "menschenlesbarer" Domainname den Zugang erleichtern.

Ich möchte im AWS Ökosystem bleiben und daher die Domain über Amazon Route 53 registrieren. Ansonsten hätte ich vielleicht einen anderen Anbieter gewählt, wie ich es schon für eine günstige Website gemacht hatte.

Wahl des Domainnamens

Das Projekt wird, zumindest auf meiner Infrastruktur, mutmaßlich nicht allzulange bestehen bleiben. Eine große Marktrecherche für einen tollen Namen brauche ich daher nicht, nur einprägsam sollte er sein.

Die wichtigste Anforderung ist ein günstiger Preis.

Die Preisübersicht auf der AWS Seite ist nicht sonderlich übersichtlich, eine "route 53 cheapest domain" zu googeln brachte aber auch nur den Link auf ein PDF zu Tage. In dem steht uA der "Registration and Renewal Price" und der ist für den TLD Namen "click" mit 3 Dollar am günstigsten.

Allerdings ist "click" nicht der beste Name im deutschsprachigen Raum: "Hey, besuch doch mal meine Seite meineApp.click" "Ich kann meineApp.klick nicht finden".

Der zweitgünstigste TLD Name mit 5 Dollar ist "link". "link" ist mir lieber als "click" und ist von der Preisdifferenz vertretbar.

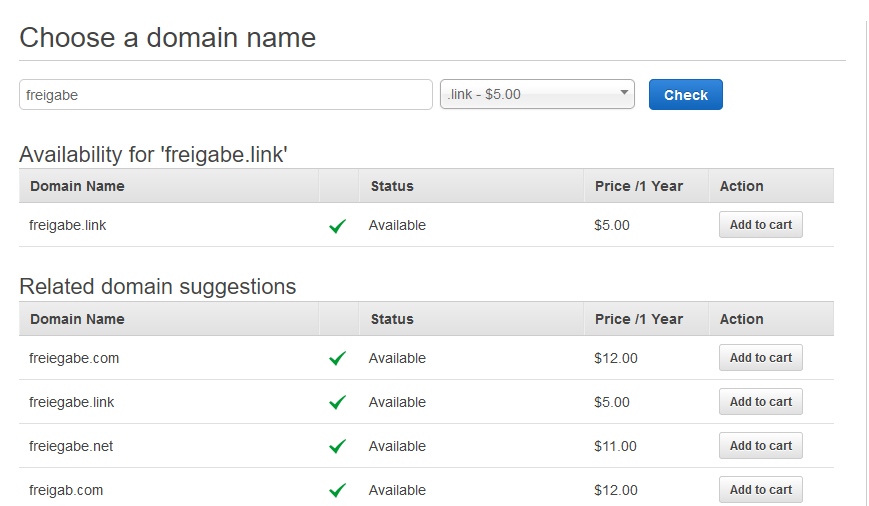
Nach kurzem Brainstorming habe ich mich dann für den Namen "freigabe" und der TLD "link", also http://freigabe.link entschieden.

Domainname registrieren

Auf die Seite des Dienstes Route 53 gehen und dort die "Domain registration" aufrufen und die gewünschte Domain eingeben:

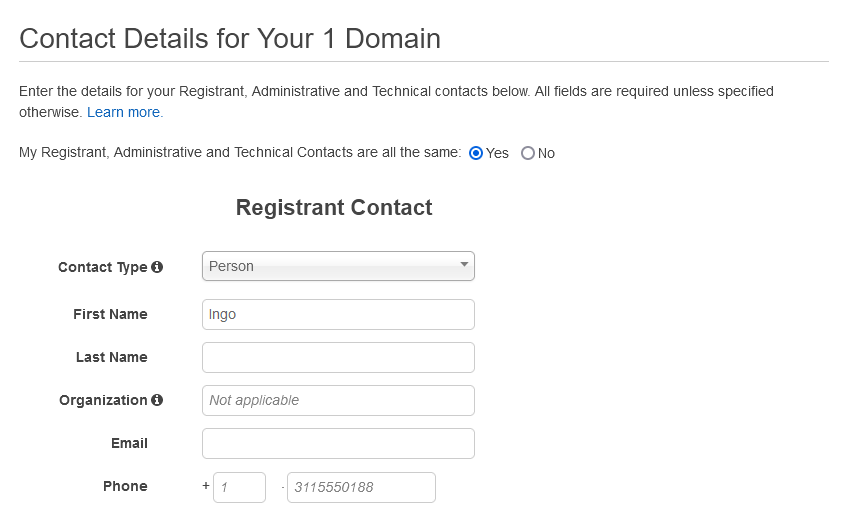
Ab in den Shopping cart und ... im nächsten Schritt muss ich meine Daten eingeben? Hey Amazon, die habt ihr doch schon!

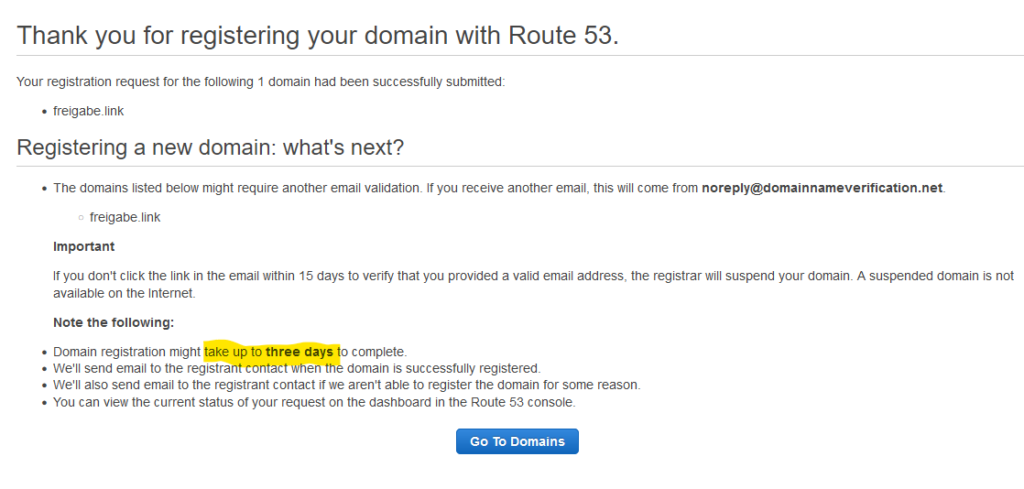
Anschließend wird die Domain auf mich registriert, was leider bis drei Tage dauern kann.

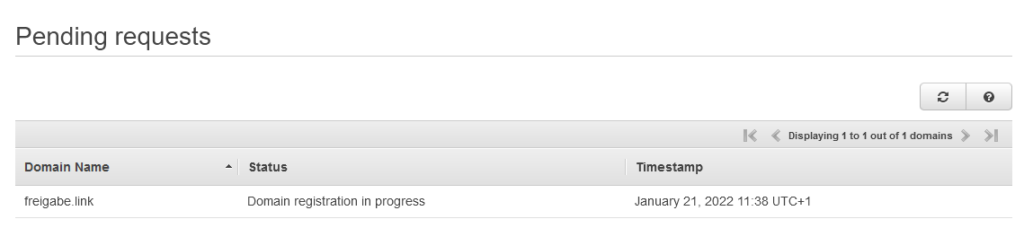
Bis zum Abschluss der Registrierung wird hier pausiert, anschließend geht es weiter mit der

Anbindung Domain Name an EC2

Die Registrierung der Domain war zum Glück bereits nach drei Stunden abgeschlossen und nicht erst nach drei Tagen. Negativ ist zu erwähnen, dass die 5 Dollar für den Domain Namen netto sind, also noch mal 19% USt hinzu kommen.

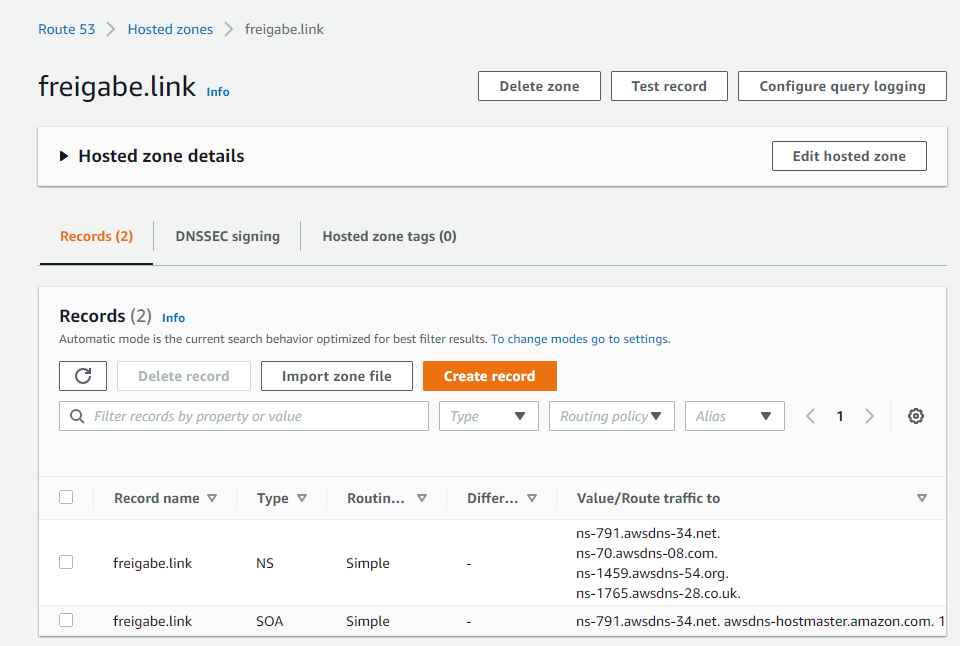
Auf der Route 53 Seite über Domains > Registered domains die Domain freigabe.link auswählen:

Über Manage DNS geht es in die Hosted zone der Domain:

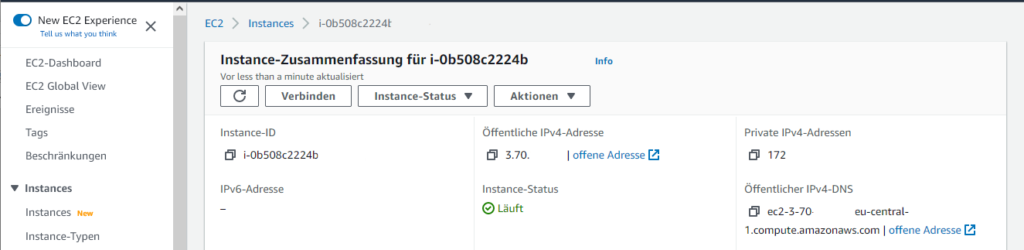
Über Create record wird der Eintrag gesetzt, dass der Domain Name auf die Public IP des EC2-Servers zeigen soll:

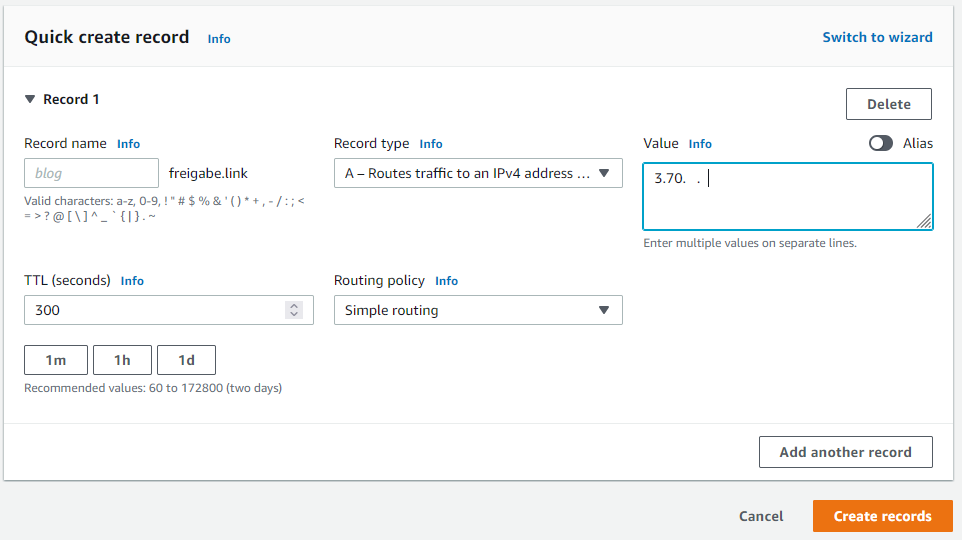
Nachdem ich den Web-Server gestartet hatte, funktionierte es auch sofort.

Der Web-Server war heruntergefahren. Ob ich das gestern noch gemacht hatte, weiß ich nicht mehr 100%ig.
In dem Catalina Log vom Tomcat fand sich uA folgender Eintrag:

Invalid character found in the request target [/index.php?s=/Index/\think\app/invokefunction&function=call_user_func_array&vars[0]=md5&vars[1][]=HelloThinkPHP21 ]. The valid characters are defined in RFC 7230 and RFC 3986

Vielleicht gab es zu viele dieser Hacking Versuche?

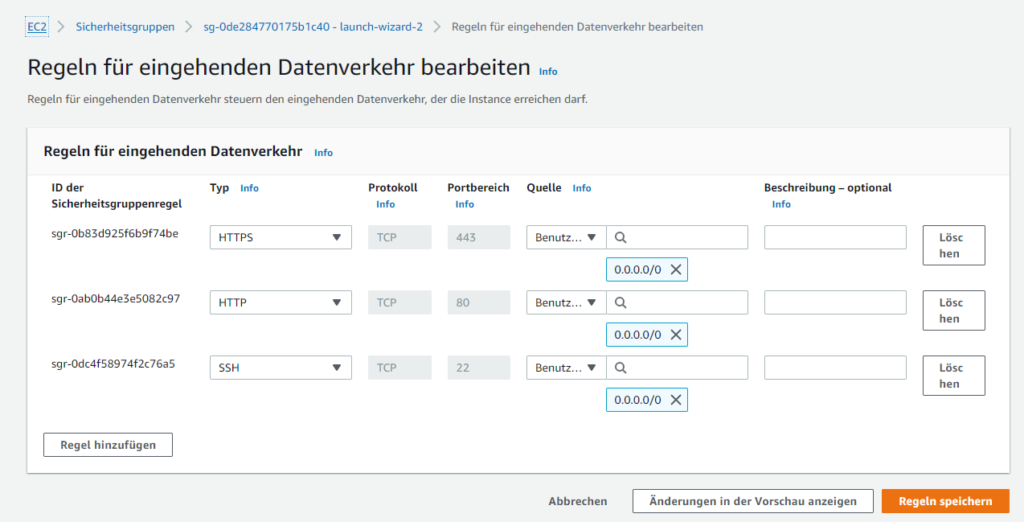
Als nächstes kommt noch ein Reverse Proxy davor, der kann noch etwas Traffic vom Tomcat fern halten.
Vielleicht werde ich aber auch noch eine WAF vor den Server setzen? Eine kurze Recherche zu dem Thema ergab allerdings, dass das nicht direkt möglich ist, sondern ein Application Load Balancer oder CloudFront zwischengeschaltet werden muss.

EMail

Ein Nebenschauplatz ist das Thema email, so dass ich Mails an diese Domain empfangen bzw. versenden kann.

Das Thema ist leider nicht ganz so simpel gelöst, wie ich es mir erhofft hatte. Einen simplen "AWS Mail Service", den man über Route 53 konfigurieren kann, gibt es nicht. Es gibt mit Amazon Workmail eine SaaS Lösung mit Focus auf Unternehmen und entsprechender Kostenstruktur.

Weiterhin wird Google Apps verschiedentlich empfohlen, aber auch das ist mit Kosten verbunden und wird nicht über die kostenfreien Angebote abgedeckt.

Eine SES / S3 Lösung deckt nur rudimentär den Bedarf, zB werden die Mails als Dateien auf einem S3 Bucket gespeichert. Da scheinen auch noch andere Konstellationen möglich zu sein, aber keine, die überzeugt.

Als kostenfreie WebMail-Lösung wird zB Zoho empfohlen. Eine Anleitung findet sich zB hier.

Es wäre natürlich auch möglich, einen eigenen WebMail-Server auf einem eigenen EC2 Server zu betreiben.

Als Mittelweg wäre auch ein weiter Docker Container auf dem vorhandenen EC2 Server möglich.

Komplettlösungen als Mailserver wären zB Mailcow, Mailu oder Kopano.

Jede Lösung ist mit mehr oder weniger Aufwand realisierbar, aber jede Lösung ist aufwändiger als meine momentane Motivation, oder aktueller Bedarf, und so setzte ich das erstmal auf die "wenn mal Zeit ist"-Liste.

Categories
AWS Development Linux

Docker Anwendung in AWS (EC2)

In meinem letzten Blogeintrag habe ich eine geDockerte Anwendung auf einem Server mit Ubuntu 18 zum laufen gebracht. Aus verschiedenen Gründen war das aber nur ein Zwischenschritt, um zu testen, ob die Anwendung grundsätzlich in solch einer Umgebung lauffähig ist. Neben den beschriebenen Problemen gab es noch viele weitere, die gelöst werden mussten.

Als nächsten Schritt möchte ich die Anwendung in die AWS umziehen, immerhin bin ich ja inzwischen ein zertifizierter Cloud Practitioner.

AWS User

Mit dem Stammbenutzer einen neuen IAM Nutzer für die Anwendung anlegen. Dieser bekommt erstmal umfangreiche Rechte, was nicht best Practice ist und später sollte ich diese Rechte auf das unbedingt benötigte zurücksetzen.

EC2 Server

Die Anwendung soll erstmal mit dem Docker Setup auf einem EC2 Server laufen.

Mit dem neuen IAM Nutzer wechsele ich zuerst auf die Europa Zone ec-central-1.

Ich lege eine neue EC2 Server Instanz an, wobei ich als Sparfuchs nach "nur kostenloses Kontingent" filtere und ein AMI für Ubuntu Server 20.04 LTS (x64) und Typ t2.micro auswähle.
Es wird ein neues Schlüsselpaar erzeugt und ich speichere den privaten Schlüssel.

Über EC2 > Instances > Server-Instanz auswählen.

Über Verbinden lässt sich im Browser ein Terminal öffnen. Hier lässt sich aber auch am einfachsten die öffentliche IP und vor allem der Benutzername finden:

Ich habe allerdings nicht die Web Shell verwendet, sondern die Daten, sowie den privaten Schlüssel genommen, um eine Verbindung in WinSCP einzurichten. So kann ich später leicht die Daten auf den Server kopieren und per Klick eine PuTTY-Shell öffnen.

Port Freigabe

Standardmäßig ist für den Server nur Port 22 für SSH frei gegeben.

Weitere Ports, wie zB der benötigte HTTP Port 80 oder HTTPS 443, lassen sich über die AWS Management Console frei geben.

Die EC2-Server-Instanz auswählen und unter Sicherheit findet sich die Sicherheitsgruppe:

In der Sicherheitsgruppe können die Regeln für den eingehenden Datenverkehr erweitert werden.
Dabei ist zu beachten, dass man weitere Regeln hinzufügen muss und nicht den bestehenden Typ SSH auf zB HTTP ändert und speichert, weil das diesen nur ändert und nicht als neue, weitere Regel hinzufügt. Dann kann man zwar die Seiten des Webservers bewundern, aber sich nicht mehr per SSH einloggen.

Server einrichten

Auf der Linux Konsole des EC2-Servers wird dieser eingerichtet, dazu wird Docker Compose installiert, was als Abhängigkeit Docker mitbringt.

apt list --upgradable
sudo apt update
sudo apt upgrade -y
sudo apt install docker-compose -y

sudo docker version         # -> 20.10.7
sudo docker-compose version # -> 1.25.0
sudo service docker status  # -> running

sudo docker run hello-world

Docker läuft und es werden die Daten der Anwendung auf den Server kopiert und anschließend über Docker Compose gestartet.

sudo docker-compose up 

Leider führte das zu einem Fehler, wie er schon bei der Ubuntu 18 Installation aufgetreten ist. Das zuvor gewonnene Wissen kann ich jetzt zur schnellen Fehlerbehebung anwenden:

sudo apt-get remove docker-compose -y
sudo curl -L https://github.com/docker/compose/releases/download/v2.2.3/docker-compose-`uname -s`-`uname -m` -o /usr/local/bin/docker-compose
sudo chmod +x /usr/local/bin/docker-compose
docker-compose --version
# Output:
-bash: /usr/bin/docker-compose: No such file or directory
# Lösung: neue Shell, zb per tmux, starten
# und dann nochmals testen
docker-compose --version
# Output:
Docker Compose version v2.2.3

Anschließend ließ sich die Anwendung per Docker Compose starten und per cURL, bzw. HTTPie, über localhost:80 und <öffentlicheIP>:80 aufrufen. Der Aufruf <öffentlicheIP>:80 vom Entwickler Laptop funktioniert auch.

Der Start dauerte etwas länger, die Webanwendung selbst ließ sich anschließend aber angenehm schnell bedienen. Zumindest als Test-Server scheint der "Gratis"-EC2-Server völlig auszureichen.

Ausblick

Auf dem kostenfreien Server laufen ein Tomcat Webserver, eine PostgreSQL Datenbank und PGAdmin und das, zumindest den ersten Tests nach, mit völlig ausreichender Performance.

Als nächstes möchte ich dem Docker Compose Konstrukt noch um einen Reverse Proxy erweitern, der eine (vermutlich nur selbstsignierte) verschlüsselte Verbindung per HTTPS anbietet und über Port 80 und 443 die Anwendung und den PGAdmin erreichbar macht. Außerdem soll es einen einfachen Authentifizierungs- und ggf. Authorisierungsmechanismus geben. Das wird mit einem Apache HTTP Server realisiert werden und sollte keinen besonderen Ressourcenbedarf haben.

Falls sich die Zeit findet, möchte ich das um Keycloak erweitern und den Zugriff auf Anwendung und PGAdmin erst nach erfolgreicher Authentifizierung und Authorisierung erlauben. Vielleicht ist das noch mit dem Apache HTTP Server realisierbar, ggf. werde ich aber auf zB Traefik umstellen.
Bei dem Setup kann ich mir schon vorstellen, dass die Ressourcen des kleinen Server nicht mehr ausreichen und es zu spürbaren Performanceeinbrüchen kommen wird.

Eine ansprechendere URL, anstelle der generierten AWS URL, wäre wünschenswert.

Categories
AWS

Cloud Practitioner Certificate

Finally I had some time to make my AWS Cloud Practitioner Certificate.

On-Demand-Video Course

The course of Stephane Maarek was really helpfull: https://www.udemy.com/course/aws-certified-cloud-practitioner-new/

The slides of the course: https://media.datacumulus.com/aws-ccp/AWS%20Certified%20Cloud%20Practitioner%20Slides%20v1.3.pdf

Practice Exams

I also learned with this practice exams from Udemy Business catalog:

  • aws-certified-cloud-practitioner-practice-test
  • practice-exams-aws-certified-cloud-practitioner
  • aws-certified-cloud-practitioner-practice-exams-c

Badge

My verified Badge at Credly: https://www.credly.com/badges/197060ea-4c32-4063-b483-90f45d37c68d/public_url

Categories
AWS

Example React application on AWS Amplify

I followed the steps through this tutorial: https://aws.amazon.com/de/getting-started/hands-on/build-react-app-amplify-graphql/

I is mostly well documented. But I had some obstacles:

Build specification

I had to add the backend part to the build specification:

version: 1
backend:
  phases:
    build:
      commands:
        - '# Execute Amplify CLI with the helper script'
        - amplifyPush --simple
frontend:
  phases:
    preBuild:
      commands:
        - npm ci
    build:
      commands:
         - npm run build
  artifacts:
    baseDirectory: build
    files:
      - '**/*'
  cache:
    paths:
      - node_modules/**/*

Service role

I had to create and add a service role.

First create a service role in IAM console, named it "AmplifyConsoleServiceRole-AmplifyRole":

Then add this role in the general settings of the Amplify application:

Amplify CLI to latest version

I had to set the Live package updates for the Amplify CLI to the latest version in build image settings:

To be continued...

Unfortunately this took too much time, so I have to do the last steps (4: API and database; 5: storage) another time. Maybe there will be some other challanges I can write down here.

Categories
AWS Java

Credentials

What I want to achieve

In my past experiments the AWS credentials were 'magically' set in the background. To learn more about AWS credentials I will remove step by step the 'magic' and set credentials explicit in my code.

Cleanup

In my first experiment I set up the credentials on my Windows machine.
To ensure, that they are provided I test with my SNS-Test Program from my last post:

package aws;

import software.amazon.awssdk.services.sns.SnsClient;
import software.amazon.awssdk.services.sns.model.ListTopicsRequest;
import software.amazon.awssdk.services.sns.model.ListTopicsResponse;

public class CredentialsTest {

	public static void main(String[] args) {		
		SnsClient snsClient = SnsClient.builder().build();
		ListTopicsRequest request = ListTopicsRequest.builder().build();
		ListTopicsResponse result = snsClient.listTopics(request);
		System.out.println("Status was " + result.sdkHttpResponse().statusCode() + "\n\nTopics\n\n" + result.topics());
	}
}

Result: A list of my SNS topics

To remove the 'magic' I rename the files credentials and config in C:\Users\USERNAME\.aws folder to credentials_backup and config_backup.

Start CredentialsTest and the result: A list of my SNS topics.
So the credentials are provided by another mechanism.

Next try to remove the 'magic' I remove environment variables AWS_ACCESS_KEY_ID, AWS_SECRET_ACCESS_KEY and AWS_DEFAULT_REGION.
As I have started my IDE with this environment variables set, I need to restart IDE first.

Start CredentialsTest and the result:

Exception in thread "main" software.amazon.awssdk.core.exception.SdkClientException: Unable to load region from any of the providers in the chain software.amazon.awssdk.regions.providers.DefaultAwsRegionProviderChain@4372b9b6: [software.amazon.awssdk.regions.providers.SystemSettingsRegionProvider@3e6f3f28: Unable to load region from system settings. Region must be specified either via environment variable (AWS_REGION) or  system property (aws.region)., software.amazon.awssdk.regions.providers.AwsProfileRegionProvider@4816278d: No region provided in profile: default, software.amazon.awssdk.regions.providers.InstanceProfileRegionProvider@1ecee32c: Unable to contact EC2 metadata service.]
	at software.amazon.awssdk.core.exception.SdkClientException$BuilderImpl.build(SdkClientException.java:98)

Provide region:

SnsClient snsClient = SnsClient.builder().region(Region.EU_CENTRAL_1).build();

Result:

Exception in thread "main" software.amazon.awssdk.core.exception.SdkClientException: Unable to load credentials from any of the providers in the chain AwsCredentialsProviderChain(credentialsProviders=[SystemPropertyCredentialsProvider(), EnvironmentVariableCredentialsProvider(), WebIdentityTokenCredentialsProvider(), ProfileCredentialsProvider(), ContainerCredentialsProvider(), InstanceProfileCredentialsProvider()]) : [SystemPropertyCredentialsProvider(): Unable to load credentials from system settings. Access key must be specified either via environment variable (AWS_ACCESS_KEY_ID) or system property (aws.accessKeyId)., EnvironmentVariableCredentialsProvider(): Unable to load credentials from system settings. Access key must be specified either via environment variable (AWS_ACCESS_KEY_ID) or system property (aws.accessKeyId)., WebIdentityTokenCredentialsProvider(): Either the environment variable AWS_WEB_IDENTITY_TOKEN_FILE or the javaproperty aws.webIdentityTokenFile must be set., ProfileCredentialsProvider(): Profile file contained no credentials for profile 'default': ProfileFile(profiles=[]), ContainerCredentialsProvider(): Cannot fetch credentials from container - neither AWS_CONTAINER_CREDENTIALS_FULL_URI or AWS_CONTAINER_CREDENTIALS_RELATIVE_URI environment variables are set., InstanceProfileCredentialsProvider(): Unable to load credentials from service endpoint.]
	at software.amazon.awssdk.core.exception.SdkClientException$BuilderImpl.build(SdkClientException.java:98)

OK, looks good so far.
Remove region from code and restore files credentials and config in C:\Users\USERNAME\.aws folder.
Run CredentialsTest, Result: A list of my SNS topics.

Rename the files credentials and config in C:\Users\USERNAME\.aws folder to credentials_backup and config_backup again.
Run CredentialsTest, Result: Unable to load region error again.

The 'magic' has been removed,

ProfileCredentialsProvider

Restore files credentials and config in C:\Users\USERNAME\.aws folder.
Empty [default] block and create a new [CredentialsTest] block:

[default]

[CredentialsTest]
aws_access_key_id = My_AWS_Access_Key_Id
aws_secret_access_key = My_AWS_Secret_Access_Key
[default]

[CredentialsTest]
region = eu-central-1

Run CredentialsTest, Result:

2020-09-09 21:13:17 [main] WARN  software.amazon.awssdk.profiles.internal.ProfileFileReader:105 - Ignoring profile 'CredentialsTest' on line 3 because it did not start with 'profile ' and it was not 'default'.
Exception in thread "main" software.amazon.awssdk.core.exception.SdkClientException: Unable to load region from any of the providers in the chain software.amazon.awssdk.regions.providers.DefaultAwsRegionProviderChain@260e86a1: [software.amazon.awssdk.regions.providers.SystemSettingsRegionProvider@59e505b2: Unable to load region from system settings. Region must be specified either via environment variable (AWS_REGION) or  system property (aws.region)., software.amazon.awssdk.regions.providers.AwsProfileRegionProvider@8e50104: No region provided in profile: default, software.amazon.awssdk.regions.providers.InstanceProfileRegionProvider@43b6123e: Unable to contact EC2 metadata service.]

So I used to try to work with the ProfileCredentialsProvider this way:

import com.amazonaws.auth.profile.ProfileCredentialsProvider;
SnsClient snsClient = SnsClient.builder().credentialsProvider(new ProfileCredentialsProvider("CredentialsTest")).build();

Unfortunatly this won't compile because:

The method credentialsProvider(AwsCredentialsProvider) in the type AwsClientBuilder<SnsClientBuilder,
 SnsClient> is not applicable for the arguments (ProfileCredentialsProvider)

Refactor to:

import software.amazon.awssdk.auth.credentials.AwsCredentialsProvider;
import software.amazon.awssdk.auth.credentials.ProfileCredentialsProvider;
AwsCredentialsProvider credentialsProvider = ProfileCredentialsProvider.builder().profileName("CredentialsTest").build();
SnsClient snsClient = SnsClient.builder().credentialsProvider(credentialsProvider).build();

Result:

2020-09-09 21:22:40 [main] WARN  software.amazon.awssdk.profiles.internal.ProfileFileReader:105 - Ignoring profile 'CredentialsTest' on line 3 because it did not start with 'profile ' and it was not 'default'.
Exception in thread "main" software.amazon.awssdk.core.exception.SdkClientException: Unable to load region from any of the providers in the chain software.amazon.awssdk.regions.providers.DefaultAwsRegionProviderChain@78f5c518: [software.amazon.awssdk.regions.providers.SystemSettingsRegionProvider@f107c50: Unable to load region from system settings. Region must be specified either via environment variable (AWS_REGION) or  system property (aws.region)., software.amazon.awssdk.regions.providers.AwsProfileRegionProvider@4ebff610: No region provided in profile: default, software.amazon.awssdk.regions.providers.InstanceProfileRegionProvider@8692d67: Unable to contact EC2 metadata service.]

Hmkay, enhance the code with a region; need to set this explicit, could not find any way to read this from the config file.

SnsClient snsClient = SnsClient.builder().credentialsProvider(credentialsProvider).region(Region.EU_CENTRAL_1).build();

Result: A list of my SNS topics.

Rename the files credentials and config in C:\Users\USERNAME\.aws folder to credentials_backup and config_backup again.
Run CredentialsTest, Result: Profile file contained no credentials for profile 'CredentialsTest' error.

Remove ProfileCredentialsProvider and Region from code.
Run CredentialsTest, Result: Unable to load region error again.

Own AwsCredentialsProvider implementation

Write an own credential provider, the simplest way:

package aws;

import software.amazon.awssdk.auth.credentials.AwsCredentials;
import software.amazon.awssdk.auth.credentials.AwsCredentialsProvider;

public class IngosCredentialProvider implements AwsCredentialsProvider {

	public AwsCredentials resolveCredentials() {
		System.out.println("IngosCredentialProvider::resolveCredentials called");
		AwsCredentials credentials = new AwsCredentials() {
			
			public String secretAccessKey() {
				return "My_AWS_Secret_Access_Key";
			}
			
			public String accessKeyId() {
				return "My_AWS_Access_Key_Id";
			}
		};
		return credentials;
	}
}

Use your own credentials provider in code, don't forget the region:

package aws;

import software.amazon.awssdk.regions.Region;
import software.amazon.awssdk.services.sns.SnsClient;
import software.amazon.awssdk.services.sns.model.ListTopicsRequest;
import software.amazon.awssdk.services.sns.model.ListTopicsResponse;

public class CredentialsTest {

	public static void main(String[] args) {
		SnsClient snsClient = SnsClient.builder().credentialsProvider(new IngosCredentialProvider()).region(Region.EU_CENTRAL_1).build();
		ListTopicsRequest request = ListTopicsRequest.builder().build();
		ListTopicsResponse result = snsClient.listTopics(request);
		System.out.println("Status was " + result.sdkHttpResponse().statusCode() + "\n\nTopics\n\n" + result.topics());
	}
}

Run CredentialsTest, Result: A list of my SNS topics.

Categories
AWS Java

Simple Notification Service

What I want to do today

Create a SNS, send and receive messages.

Create SNS

Just go to Amazon SNS -> Topics -> Create topic and set a name for the topic:

In the next screen I create a subscription with Protocol Email and my email address. Immediately I got an email with a link to subscribe to the topic. After Confirmation I can check in the Subsriptions view that the status has changed to "Confirmed".

There is a Amazon SNS -> Topics -> MyFirstTestTopic -> Publish message function in the AWS Console to publish a message to topic, which is a good way to test the service.

Java Code

I continue with my test project from my last post.

List SNS Topics

SnsClient snsClient = SnsClient.builder().region(Region.EU_CENTRAL_1).build();
ListTopicsRequest request = ListTopicsRequest.builder().build();
ListTopicsResponse result = snsClient.listTopics(request);
System.out.println("Status was " + result.sdkHttpResponse().statusCode() + "\n\nTopics\n\n" + result.topics());

Lists all topics of my AWS account.

Publish message to topic

SnsClient snsClient = SnsClient.builder().region(Region.EU_CENTRAL_1).build();
String topicArn = "arn:aws:sns:eu-central-1:175335015168:MyFirstTestTopic";
String message = "This is a test (c)DerIngo";
PublishRequest request = PublishRequest.builder().message(message).topicArn(topicArn).build();
PublishResponse result = snsClient.publish(request);
System.out.println(result.messageId() + " Message sent. Status was " + result.sdkHttpResponse().statusCode());

Test email received, it works, YAY!

I

Categories
AWS Java

AWS Glacier

What I want to do today

As next step to proceed further with my AWS experiences I would like to create a data storage, where I can upload some files programatically and retrive an email every time a file was uploaded.
Within all this activities some metrics should be generated, so I can see them in CloudWatch service and retrive data with my First Test Application for AWS.

Create data storage

Amazon Simple Storage Service (Amazon S3) is an object storage service and Amazon S3 Glacier is an extremely low-cost storage service, ex. for backup. So I decided to go with Glacier, because I like it cheap for my tests.

First step is to create a Vault, which is a container for storing archives.
A Vault is created with a region (EU Frankfurt) and a name ("MyFirstSampleGlacierVault") and some useful information is shown in creation screen:

Data is stored in S3 Glacier in "archives." An archive can be any data such as a photo, video, or document. You can upload a single file as an archive or aggregate multiple files into a TAR or ZIP file and upload as one archive.

A single archive can be as large as 40 terabytes. You can store an unlimited number of archives and an unlimited amount of data in S3 Glacier. Each archive is assigned a unique archive ID at the time of creation, and the content of the archive is immutable, meaning that after an archive is created it cannot be updated.

Vaults allow you to organize your archives and set access policies and notification policies.

In the second step I "Enable notifications and create a new SNS topic" and set the topic name to "MyFirstSampleGlacierVaultSNS" in the third step. and I have to "Select the job type(s) you want to trigger your notifications". As I do not know what this practically means by now, I select both: "Archive Retrieval Job Complete" and "Vault Inventory Retrieval Job Complete".
In the settings of the created Vault I can check, that the Retrieval policies is set to "Free Tier Only", which is great, becaus it means:

Data retrieval requests that exceed the free tier will not be accepted.

Retrieval Cost: Free

IAM Access

To access programatically to my S3 Glacier Vault I create a new user: "MyFirstSampleGlacierVaultTestUser" with Programmatic access and attach the existing "AmazonGlacierFullAccess" policy directly.
As per my current understanding, this allows this user to do everything on every Glacier Vault? I need to check later, if/how I can restrict access to my Test Vault only.

Java Code

I continue with my test project from my last post.

Maven

I have added the entire AWS SDK, I thought. But as I tried to create an AmazonGlacierClient I figured out, that I had to add the Glacier Service SKD to the "entire" AWS SDK:

	<dependencies>
		<dependency>
			<groupId>com.amazonaws</groupId>
			<artifactId>aws-java-sdk-glacier</artifactId>
			<version>1.11.852</version>
		</dependency>
	</dependencies>

Credentials

For my first test I added the credentials to system environment properties and created the /.aws/crendentials file. But this was with credentials for the CloudWatch user. Now I need to use the credentials of my Glacier user.

I found min. three ways to provide the Glacier user credentials.

For the first way I have to add a new section to the credentials file and select this profile:

[glacierUser]
aws_access_key_id = the_Access_Key_Id
aws_secret_access_key = the_Secret_Access_Key
System.setProperty("aws.profile", "glacierUser");

For the second way I have to set the properties directly in Java code:

System.setProperty("aws.accessKeyId", "the_Access_Key_Id");
System.setProperty("aws.secretAccessKey", "the_Secret_Access_Key");

I guess, both ways should work. But I only tested the third way, to build an AWSCredentials object:

AWSCredentials awsCredentials = new AWSCredentials() {
			
			public String getAWSSecretKey() {
				return "the_Secret_Access_Key";
			}
			
			public String getAWSAccessKeyId() {
				return "the_Access_Key_Id";
			}
		};

I don't think, it is a good idea to store credentials in code, but I am just testing to get things working.

Create a Glacier client and test

First create a Glacier client and then test to create and delete a new Vault.

Create a Glacier client with both deprecated Constructor and setEndpoint Method; maybe I search for an un-deprecated way later:

AmazonGlacierClient client = new AmazonGlacierClient(awsCredentials);
client.setEndpoint("https://glacier.eu-central-1.amazonaws.com/");

Test to create a new Vault:

CreateVaultRequest request = new CreateVaultRequest()
	.withVaultName("HURZ");
CreateVaultResult result = client.createVault(request);

System.out.println("Created vault successfully: " + result.getLocation());

I checked the Vault creation in S3 Glacier Vaults overview:

It worked, so I can delete it:

DeleteVaultRequest deleteRequest = new DeleteVaultRequest()
    .withVaultName("HURZ");
DeleteVaultResult deleteResult = client.deleteVault(deleteRequest);
System.out.println("Deleted vault with HTTP status code: " + deleteResult.getSdkHttpMetadata().getHttpStatusCode());

Returned a HTTP status code 204, doublechecked in Vaults overview:

YAY! It works! Next test:

File up- and download

To upload a file to my Vault I need a ArchiveTransfer Manager:

String vaultName  = "MyFirstSampleGlacierVault";
String fileToUpload = "src/main/resources/cute_kitty.jpg";

ArchiveTransferManager atm = new ArchiveTransferManager(client, awsCredentials);
try {
	String archiveId = atm.upload(vaultName, "Cute Kitty Pic", new File(fileToUpload)).getArchiveId();
	System.out.println("Kitties archive ID: " + archiveId);
} catch (AmazonClientException | FileNotFoundException e) {
	// TODO Auto-generated catch block
	e.printStackTrace();
}

It seems to work, becaus there is no Error but an Archive ID of my cute kitty pic.

Let's try to download the file from Glacier; just add one line into the try-block:

atm.download(vaultName, archiveId, new File(fileToUpload+"_fromGlacier"));

Unfortunatly this ends in an ERROR/WARNING but no file is downloaded:

com.amazonaws.services.sqs.model.AmazonSQSException: Access to the resource https://sqs.us-east-1.amazonaws.com/ is denied. (Service: AmazonSQS; Status Code: 403; Error Code: AccessDenied; Request ID: 3eb8ca32-120b-520a-8383-9dfbb53cb96e; Proxy: null)

Strange: "the resource https://sqs.us-east-1.amazonaws.com/". My Vault is in Europe!
I will change the code to explicite set this to Europe:

AmazonGlacierClient glacierClient = new AmazonGlacierClient(awsCredentials);
AmazonSQSClient sqsClient = new AmazonSQSClient(awsCredentials);
AmazonSNSClient snsClient = new AmazonSNSClient(awsCredentials);

glacierClient.setEndpoint("glacier.eu-central-1.amazonaws.com");
sqsClient.setEndpoint("sqs.eu-central-1.amazonaws.com");
snsClient.setEndpoint("sns.eu-central-1.amazonaws.com");

ArchiveTransferManager atm = new ArchiveTransferManager(glacierClient, sqsClient, snsClient);

String vaultName  = "MyFirstSampleGlacierVault";
String fileToUpload = "src/main/resources/cute_kitty.jpg";

try {
	String archiveId = atm.upload(vaultName, "Cute Kitty Pic", new File(fileToUpload)).getArchiveId();
	System.out.println("Kitties archive ID: " + archiveId);
	atm.download(vaultName, archiveId, new File(fileToUpload+"_fromGlacier"));
} catch (AmazonClientException | FileNotFoundException e) {
	e.printStackTrace();
}

Lots of deprecated warnings; I'll ignore them all.
Result stays the same, only difference that the access is now denied for Europe:

WARNING: An illegal reflective access operation has occurred
WARNING: Illegal reflective access by com.amazonaws.util.XpathUtils (file:/C:/Users/i-kau/.m2/repository/com/amazonaws/aws-java-sdk-core/1.11.852/aws-java-sdk-core-1.11.852.jar) to constructor com.sun.org.apache.xpath.internal.XPathContext()
WARNING: Please consider reporting this to the maintainers of com.amazonaws.util.XpathUtils
WARNING: Use --illegal-access=warn to enable warnings of further illegal reflective access operations
WARNING: All illegal access operations will be denied in a future release
com.amazonaws.services.sqs.model.AmazonSQSException: Access to the resource https://sqs.eu-central-1.amazonaws.com/ is denied. (Service: AmazonSQS; Status Code: 403; Error Code: AccessDenied; Request ID: 1d9d83e6-f301-5137-940d-d42f58994ce4; Proxy: null)

Unfortunatly there is no console (browser) support for Glacier, so I cannot test right now, if this is a problem with the permissions or with the XpathUtils library.

As this is all just for testing, I can live with this error and proceed with testing other services.

Categories
AWS Java

Getting Started with AWS

Create an IAM user

I want to start with some practical experiences in AWS, so I go to https://aws.amazon.com, login with my Root user and open the Identity and Access Management (IAM ), where I create aa new IAM user, that I call "MyFirstProgrammaticAccessTestUser", because the user is of access type Programmatic access. For now, I do not add the user to any group and add only one tag (that I name tag-key) to the user.
AWS is warning, that this user has not permissons, but this is fine for now, I will add any permission as soon as the user needs one.
Finally I note down the user name, Access key ID and the secret access key.

Set up AWS credentials and region

I am working on a Windows machine, so I create a folder .aws in C:\Users\USERNAME. In this folder I create a file credentials:

[default]
aws_access_key_id = your_access_key_id
aws_secret_access_key = your_secret_access_key

To set the default AWS Region I have to create another file in .aws folder: config:

[default]
region = eu-central-1

Additionally I have to set this information as environment variables.

I am really not sure, if this is the correct way to set this environment variables, but hey, this is only a test.

AWS SDK

I have to go to https://github.com/aws/aws-sdk-java-v2 to get the Clone with HTTPS URL.
Then open Eclipse and use the IMPORT dialog to import the project from GIT.
After checkout use the Configure -> Convert to Maven project dialog.
Then I tried Run as -> Maven install. But this results in a Build Failure:

[ERROR] Failed to execute goal com.github.spotbugs:spotbugs-maven-plugin:3.1.11:spotbugs (spotbugs) on project annotations: Execution spotbugs of goal com.github.spotbugs:spotbugs-maven-plugin:3.1.11:spotbugs failed: java.lang.IllegalArgumentException: Unsupported class file major version 57 -> [Help 1]

I found a clue, that I have to use Java 11 instead of my Java 13. So I downloaded a Java 11 JDK and added it to my Eclipse.
But unfortunately I have no clue, how to tell the embedded Eclipse Maven to use this Java 11 instead of Java 13. Great....NOT

Next try: Start a WSL Bash. Need to install Java and Maven first:

sudo apt install -y openjdk-11-jre maven
cd /mnt/[...]/aws-sdk-java-v2
mvn clean install

Now it took 15 minutes to run until it ends wit an ERROR: There are test failures.

While I was waiting for the WSL-Maven to finish, I figured out, how to tell the Eclipse-Maven to run with the Java 11: I have to create a new Run Configuration where I explicite select the JRE:

The Eclipse-Maven also ends with an ERROR: There are test failures.

But for today I am fine with this result.

Create an AWS Maven Project

I create a new Maven project in Eclipse where I pull in the entire AWS SDK. This is not a good choice for a real world application, where you should only pull in components you need, but for a test project it's a good start.
This is my pom.xml:

<project xmlns="http://maven.apache.org/POM/4.0.0"
	xmlns:xsi="http://www.w3.org/2001/XMLSchema-instance"
	xsi:schemaLocation="http://maven.apache.org/POM/4.0.0 https://maven.apache.org/xsd/maven-4.0.0.xsd">
	<modelVersion>4.0.0</modelVersion>
	<groupId>test</groupId>
	<artifactId>aws</artifactId>
	<version>0.0.1-SNAPSHOT</version>
	<packaging>war</packaging>

	<properties>
		<java.version>1.8</java.version>
		<project.build.sourceEncoding>UTF-8</project.build.sourceEncoding>
		<aws.java.sdk.version>2.14.7</aws.java.sdk.version>
	</properties>

	<dependencyManagement>
		<dependencies>
			<dependency>
				<groupId>software.amazon.awssdk</groupId>
				<artifactId>bom</artifactId>
				<version>${aws.java.sdk.version}</version>
				<type>pom</type>
				<scope>import</scope>
			</dependency>
		</dependencies>
	</dependencyManagement>

	<dependencies>
		<dependency>
			<groupId>software.amazon.awssdk</groupId>
			<artifactId>aws-sdk-java</artifactId>
			<version>${aws.java.sdk.version}</version>
		</dependency>
		<dependency>
			<groupId>org.apache.tomcat</groupId>
			<artifactId>tomcat-catalina</artifactId>
			<version>8.5.33</version>
			<scope>provided</scope>
		</dependency>
	</dependencies>

	<build>
		<plugins>
			<plugin>
				<groupId>org.apache.maven.plugins</groupId>
				<artifactId>maven-compiler-plugin</artifactId>
				<version>3.8.0</version>
				<configuration>
					<source>${java.version}</source>
					<target>${java.version}</target>
				</configuration>
			</plugin>
			<plugin>
				<groupId>org.apache.maven.plugins</groupId>
				<artifactId>maven-war-plugin</artifactId>
				<version>3.2.2</version>
				<configuration>
					<failOnMissingWebXml>false</failOnMissingWebXml>
					<warName>ROOT</warName>
					<wtpContextName>ROOT</wtpContextName>
				</configuration>
			</plugin>
		</plugins>
	</build>
</project>

Add AWS SDK Logging

I wanted to add some logging so I put Log4J Libs dependencies to pom.xml and create a log4j2.xml file for configuration in src/main/resources folder.

log4j2.xml:

<?xml version="1.0" encoding="UTF-8"?>
<Configuration status="WARN">
  <Appenders>
    <Console name="ConsoleAppender" target="SYSTEM_OUT">
      <PatternLayout pattern="%%d{YYYY-MM-dd HH:mm:ss} [%%t] %%-5p %%c:%%L - %%m%%n" />
    </Console>
  </Appenders>

  <Loggers>
    <Root level="WARN">
     <AppenderRef ref="ConsoleAppender"/>
    </Root>
    <Logger name="software.amazon.awssdk" level="WARN" />
    <Logger name="software.amazon.awssdk.request" level="DEBUG" />
    <Logger name="org.apache.http.wire" level="DEBUG" />
  </Loggers>
</Configuration>

pom.xml:

	<properties>
		<org.apache.logging.log4j.version>2.13.3</org.apache.logging.log4j.version>
	</properties>

	<dependencies>
		<dependency>
			<groupId>org.apache.logging.log4j</groupId>
			<artifactId>log4j-core</artifactId>
			<version>${org.apache.logging.log4j.version}</version>
		</dependency>
		<dependency>
			<groupId>org.apache.logging.log4j</groupId>
			<artifactId>log4j-api</artifactId>
			<version>${org.apache.logging.log4j.version}</version>
		</dependency>
		<dependency>
			<groupId>org.apache.logging.log4j</groupId>
			<artifactId>log4j-slf4j-impl</artifactId>
			<version>${org.apache.logging.log4j.version}</version>
		</dependency>
	</dependencies>

First Test Application

A fist simple Test application to get some CloudeWatch metrics:

package aws;

import software.amazon.awssdk.regions.Region;
import software.amazon.awssdk.services.cloudwatch.CloudWatchClient;
import software.amazon.awssdk.services.cloudwatch.model.ListMetricsRequest;
import software.amazon.awssdk.services.cloudwatch.model.ListMetricsResponse;
import software.amazon.awssdk.services.cloudwatch.model.Metric;

public class TestMain {

	public static void main(String[] args) {
		String namespace = "<metric-namespace>";
		Region region = Region.EU_CENTRAL_1;
		CloudWatchClient cw = CloudWatchClient.builder()
                .region(region)
                .build();
		listMets(cw, namespace) ;
	}
	public static void listMets( CloudWatchClient cw, String namespace) {

        boolean done = false;
        String nextToken = null;

        while(!done) {

            ListMetricsResponse response;

            if (nextToken == null) {
                ListMetricsRequest request = ListMetricsRequest.builder()
                        .namespace(namespace)
                        .build();

                response = cw.listMetrics(request);
            } else {
                ListMetricsRequest request = ListMetricsRequest.builder()
                        .namespace(namespace)
                        .nextToken(nextToken)
                        .build();

                response = cw.listMetrics(request);
            }

            for (Metric metric : response.metrics()) {
                System.out.printf(
                        "Retrieved metric %%s", metric.metricName());
                System.out.println();
            }

            if(response.nextToken() == null) {
                done = true;
            } else {
                nextToken = response.nextToken();
            }
        }
    }
}

Result:

020-09-01 19:23:07 [main] DEBUG software.amazon.awssdk.request:84 - Sending Request: DefaultSdkHttpFullRequest(httpMethod=POST, protocol=https, host=monitoring.eu-central-1.amazonaws.com, encodedPath=, headers=[amz-sdk-invocation-id, Content-Length, Content-Type, User-Agent], queryParameters=[])
2020-09-01 19:23:08 [main] DEBUG software.amazon.awssdk.request:84 - Received error response: software.amazon.awssdk.services.cloudwatch.model.CloudWatchException: User: arn:aws:iam::175335015168:user/MyFirstProgrammaticAccessTestUser is not authorized to perform: cloudwatch:ListMetrics (Service: CloudWatch, Status Code: 403, Request ID: 75f02535-28c7-49c8-930a-b8d8449c625a, Extended Request ID: null)
Exception in thread "main" software.amazon.awssdk.services.cloudwatch.model.CloudWatchException: User: arn:aws:iam::175335015168:user/MyFirstProgrammaticAccessTestUser is not authorized to perform: cloudwatch:ListMetrics (Service: CloudWatch, Status Code: 403, Request ID: 75f02535-28c7-49c8-930a-b8d8449c625a, Extended Request ID: null)
	at software.amazon.awssdk.core.internal.http.CombinedResponseHandler.handleErrorResponse(CombinedResponseHandler.java:123)
	at software.amazon.awssdk.core.internal.http.CombinedResponseHandler.handleResponse(CombinedResponseHandler.java:79)
	at software.amazon.awssdk.core.internal.http.CombinedResponseHandler.handle(CombinedResponseHandler.java:59)
	at software.amazon.awssdk.core.internal.http.CombinedResponseHandler.handle(CombinedResponseHandler.java:40)
	at software.amazon.awssdk.core.internal.http.pipeline.stages.HandleResponseStage.execute(HandleResponseStage.java:40)
	at software.amazon.awssdk.core.internal.http.pipeline.stages.HandleResponseStage.execute(HandleResponseStage.java:30)
	at software.amazon.awssdk.core.internal.http.pipeline.RequestPipelineBuilder$ComposingRequestPipelineStage.execute(RequestPipelineBuilder.java:206)
	at software.amazon.awssdk.core.internal.http.pipeline.stages.ApiCallAttemptTimeoutTrackingStage.execute(ApiCallAttemptTimeoutTrackingStage.java:73)
	at software.amazon.awssdk.core.internal.http.pipeline.stages.ApiCallAttemptTimeoutTrackingStage.execute(ApiCallAttemptTimeoutTrackingStage.java:42)
	at software.amazon.awssdk.core.internal.http.pipeline.stages.TimeoutExceptionHandlingStage.execute(TimeoutExceptionHandlingStage.java:77)
	at software.amazon.awssdk.core.internal.http.pipeline.stages.TimeoutExceptionHandlingStage.execute(TimeoutExceptionHandlingStage.java:39)
	at software.amazon.awssdk.core.internal.http.pipeline.stages.ApiCallAttemptMetricCollectionStage.execute(ApiCallAttemptMetricCollectionStage.java:50)
	at software.amazon.awssdk.core.internal.http.pipeline.stages.ApiCallAttemptMetricCollectionStage.execute(ApiCallAttemptMetricCollectionStage.java:36)
	at software.amazon.awssdk.core.internal.http.pipeline.stages.RetryableStage.execute(RetryableStage.java:64)
	at software.amazon.awssdk.core.internal.http.pipeline.stages.RetryableStage.execute(RetryableStage.java:34)
	at software.amazon.awssdk.core.internal.http.pipeline.RequestPipelineBuilder$ComposingRequestPipelineStage.execute(RequestPipelineBuilder.java:206)
	at software.amazon.awssdk.core.internal.http.StreamManagingStage.execute(StreamManagingStage.java:56)
	at software.amazon.awssdk.core.internal.http.StreamManagingStage.execute(StreamManagingStage.java:36)
	at software.amazon.awssdk.core.internal.http.pipeline.stages.ApiCallTimeoutTrackingStage.executeWithTimer(ApiCallTimeoutTrackingStage.java:80)
	at software.amazon.awssdk.core.internal.http.pipeline.stages.ApiCallTimeoutTrackingStage.execute(ApiCallTimeoutTrackingStage.java:60)
	at software.amazon.awssdk.core.internal.http.pipeline.stages.ApiCallTimeoutTrackingStage.execute(ApiCallTimeoutTrackingStage.java:42)
	at software.amazon.awssdk.core.internal.http.pipeline.stages.ApiCallMetricCollectionStage.execute(ApiCallMetricCollectionStage.java:48)
	at software.amazon.awssdk.core.internal.http.pipeline.stages.ApiCallMetricCollectionStage.execute(ApiCallMetricCollectionStage.java:31)
	at software.amazon.awssdk.core.internal.http.pipeline.RequestPipelineBuilder$ComposingRequestPipelineStage.execute(RequestPipelineBuilder.java:206)
	at software.amazon.awssdk.core.internal.http.pipeline.RequestPipelineBuilder$ComposingRequestPipelineStage.execute(RequestPipelineBuilder.java:206)
	at software.amazon.awssdk.core.internal.http.pipeline.stages.ExecutionFailureExceptionReportingStage.execute(ExecutionFailureExceptionReportingStage.java:37)
	at software.amazon.awssdk.core.internal.http.pipeline.stages.ExecutionFailureExceptionReportingStage.execute(ExecutionFailureExceptionReportingStage.java:26)
	at software.amazon.awssdk.core.internal.http.AmazonSyncHttpClient$RequestExecutionBuilderImpl.execute(AmazonSyncHttpClient.java:193)
	at software.amazon.awssdk.core.internal.handler.BaseSyncClientHandler.invoke(BaseSyncClientHandler.java:128)
	at software.amazon.awssdk.core.internal.handler.BaseSyncClientHandler.doExecute(BaseSyncClientHandler.java:154)
	at software.amazon.awssdk.core.internal.handler.BaseSyncClientHandler.lambda$execute$1(BaseSyncClientHandler.java:107)
	at software.amazon.awssdk.core.internal.handler.BaseSyncClientHandler.measureApiCallSuccess(BaseSyncClientHandler.java:162)
	at software.amazon.awssdk.core.internal.handler.BaseSyncClientHandler.execute(BaseSyncClientHandler.java:91)
	at software.amazon.awssdk.core.client.handler.SdkSyncClientHandler.execute(SdkSyncClientHandler.java:45)
	at software.amazon.awssdk.awscore.client.handler.AwsSyncClientHandler.execute(AwsSyncClientHandler.java:55)
	at software.amazon.awssdk.services.cloudwatch.DefaultCloudWatchClient.listMetrics(DefaultCloudWatchClient.java:1877)
	at aws.TestMain.listMets(TestMain.java:33)
	at aws.TestMain.main(TestMain.java:17)

So the Error is:

user/MyFirstProgrammaticAccessTestUser is not authorized to perform: cloudwatch:ListMetrics

I try to solve this by going back to the IAM console and add the user to a new created group with attached policy "CloudWatchFullAccess".

Result:

2020-09-01 19:38:27 [main] DEBUG software.amazon.awssdk.request:84 - Sending Request: DefaultSdkHttpFullRequest(httpMethod=POST, protocol=https, host=monitoring.eu-central-1.amazonaws.com, encodedPath=, headers=[amz-sdk-invocation-id, Content-Length, Content-Type, User-Agent], queryParameters=[])
2020-09-01 19:38:28 [main] DEBUG software.amazon.awssdk.request:84 - Received successful response: 200

So this worked, this was quite intuitive 🙂
The result is empty, I guess because of the metric-namespace that I initaly set with placeholder name. I looked into my CloudWatch Dashboard, but could not find any metric with data. I guess, I have to create a metric and find a way to create data for the metric. TBC

Categories
AWS

Sharetificate

Today I made my first AWS Certificate and I want to share this.

I have to login to AWS Certification with my APN account. There I had to create a ne CertMetrics account on the first visit, that automatically got connected with my APN account. Afterwards I can open the CertMetrics page, where I had to enter some information about me first. Then I could go to the Digigal Badges section, where I had to sign in to another Platform: Credly's Acclaim Platform, to create another new account.
On my Credly's page I cannot see any badges or certificates.

Now I have two additional accounts, CertMetrics and Credly's, but still can not share my certificate.
Maybe it is not possible to share this certicate, maby I have to do the AWS Cloud Practicioner certificate first to share something?