Categories
Development

OpenAI: Text to Speech

Example how to listen to an article from Heise.

MP3 from Text with OpenAI

Create an .env file with an API Key for OpenAI:

OPENAI_API_KEY=mySecretKey

According to OpenAPI documentation this is a sample code to generate Speech from Text:

from pathlib import Path
from openai import OpenAI
client = OpenAI()

speech_file_path = Path(__file__).parent / "speech.mp3"
response = client.audio.speech.create(
  model="tts-1",
  voice="alloy",
  input="Today is a wonderful day to build something people love!"
)

response.stream_to_file(speech_file_path)

To execute this sample I have to install openai first:

pip install openai

To play the mp3-file I have to install ffmpeg first:

sudo apt install ffmpeg

Create mp3 and play it:

# run sample code
python sample.py
# play soundfile
ffplay speech.mp3

Play MP3 with Python

Install pygame:

pip install pygame
from pathlib import Path
import pygame

def play_mp3(file_path):
    pygame.mixer.init()
    pygame.mixer.music.load(file_path)
    pygame.mixer.music.play()

    # Keep the program running while the music plays
    while pygame.mixer.music.get_busy():
        pygame.time.Clock().tick(10)

# Usage
speech_file_path = Path(__file__).parent / "speech.mp3"
play_mp3(speech_file_path)
python playmp3.py

Read Heise Article

from dotenv import load_dotenv
from pathlib import Path
from openai import OpenAI
import selenium.webdriver as webdriver
from selenium.webdriver.chrome.service import Service
from selenium.webdriver.chrome.options import Options
from bs4 import BeautifulSoup
import pygame

def scrape_website(website):
    print("Launching chrome browser...")
    service = Service()
    options = Options()
    options.headless = True  # Headless-Modus aktivieren, um den Browser unsichtbar zu machen

    driver = webdriver.Chrome(service=service, options=options)

    try:
        driver.get(website)
        print("Page loaded...")
        html = driver.page_source
        return html
    finally:
        driver.quit()


def split_dom_content(dom_content, max_length=6000):
    return [
        dom_content[i : i + max_length] for i in range(0, len(dom_content), max_length)
    ]


def scrape_heise_website(website):
    html  = scrape_website(website)

    # BeautifulSoup zum Parsen des HTML-Codes verwenden
    soup = BeautifulSoup(html, 'html.parser')

    # Artikel-Header und -Inhalt extrahieren
    # Der Header ist oft in einem <h1>-Tag zu finden
    header_title = soup.find('h1', {'class': 'a-article-header__title'}).get_text().strip()
    header_lead  = soup.find('p',  {'class': 'a-article-header__lead'}).get_text().strip()

    # Der eigentliche Artikelinhalt befindet sich oft in einem <div>-Tag mit der Klasse 'article-content'
    article_div = soup.find('div', {'class': 'article-content'})
    paragraphs = article_div.find_all('p') if article_div else []
    # 'redakteurskuerzel' entfernen
    for para in paragraphs:
        spans_to_remove = para.find_all('span', {'class': 'redakteurskuerzel'})
        for span in spans_to_remove:
            span.decompose()  # Entfernt den Tag vollständig aus dem Baum

    article_content = "\n".join([para.get_text().strip() for para in paragraphs])

    return article_content
    # Header und Artikelinhalt ausgeben
    #result = "Header Title:" + header_title + "\nHeader Lead:" + header_lead + "\nContent:" + article_content
    #return result

def article_to_mp3(article_content):
    client = OpenAI()

    speech_file_path = Path(__file__).parent / "speech.mp3"
    response = client.audio.speech.create(
        model="tts-1",
        voice="alloy",
        input=article_content
    )

    response.stream_to_file(speech_file_path)

def play_mp3():
    speech_file_path = Path(__file__).parent / "speech.mp3"
    pygame.mixer.init()
    pygame.mixer.music.load(speech_file_path)
    pygame.mixer.music.play()

    # Keep the program running while the music plays
    while pygame.mixer.music.get_busy():
        pygame.time.Clock().tick(10)


# .env-Datei laden#
load_dotenv()
article_content = scrape_heise_website("https://www.heise.de/news/Streit-ueber-Kosten-Meta-kappt-Leitungen-zur-Telekom-9953162.html")
article_to_mp3(article_content)
play_mp3()
Categories
Development

Python environment variables

For my Python applications I want to use variables from an .env file, so I can store this in a local file for configuration flexibility.

Example:

OPENAI_API_KEY=mySecretKey
import os
from dotenv import load_dotenv

# .env-Datei laden
load_dotenv()
print("OPENAI_API_KEY: " + os.getenv("OPENAI_API_KEY"))
python envexample.py
OPENAI_API_KEY: mySecretKey
Categories
Development

Web Scraping

Web Scraping with Python on my WSL environment.

Python virtual Environment

Open WSL Terminal, switch into the folder for my Web Scraping project and create a virtual environment first.

# Python virtual Environment
## Install
### On Debian/Ubuntu systems, you need to install the python3-venv package
sudo apt install python3.10-venv -y
python3 -m venv ai
## Activate
source ai/bin/activate

Visual Code

Open Visual Code IDE with code .

Change Python Interpreter to the one of virtual Environment

When working in a Terminal window in VS then the virtual environment has also to be activated in this terminal window: source ai/bin/activate

Requirements

I put all required external libraries and their specific versions my project relies on in a seperate file: requirements.txt.
In Python projects this is considered best practice.

selenium

Installation:

pip install -r requirements.txt

Selenium

Selenium is a powerful automation tool for web browsers. It allows you to control web browsers programmatically, simulating user interactions like clicking buttons, filling out forms, and navigating between pages. This makes it ideal for tasks such as web testing, web scraping, and browser automation.

As of Selenium 4.6, Selenium downloads the correct driver for you. You shouldn’t need to do anything. If you are using the latest version of Selenium and you are getting an error, please turn on logging and file a bug report with that information. Quelle

So installation of Google Chrome and Google Chrome Webdriver is not required anymore.
But I had to install some additional libraries on WSL:

sudo apt install libnss3 libgbm1 libasound2

Exkurs: Google Chrome

To find missing libraries I downloaded Google Chrome and tried to start it until all missing libraries were installed.

Page to find download link:

https://googlechromelabs.github.io/chrome-for-testing/#stable

## Google Chrome
wget https://storage.googleapis.com/chrome-for-testing-public/129.0.6668.70/linux64/chrome-linux64.zip
unzip chrome-linux64.zip
mv chrome-linux64 chrome

## Google Chrome Webdriver
wget https://storage.googleapis.com/chrome-for-testing-public/129.0.6668.70/linux64/chromedriver-linux64.zip
unzip chromedriver-linux64.zip
mv chromedriver-linux64 chromedriver
cp chromedriver/chromedriver chrome/chromedriver

cd chrome
./chromedriver

Scrape a single page

import selenium.webdriver as webdriver
from selenium.webdriver.chrome.service import Service

def scrape_website(website):
    print("Launching chrome browser...")
    driver= webdriver.Chrome()

    try:
        driver.get(website)
        print("Page loaded...")
        html = driver.page_source
        return html
    finally:
        driver.quit()

print(scrape_website("https://www.selenium.dev/"))
python scrape.py

Scape a Heise News Article

Extract Article Header, Article Lead and Article itself:

import selenium.webdriver as webdriver
from selenium.webdriver.chrome.service import Service
from selenium.webdriver.chrome.options import Options
from bs4 import BeautifulSoup

def scrape_website(website):
    print("Launching chrome browser...")
    service = Service()
    options = Options()
    options.headless = True  # Headless-Modus aktivieren, um den Browser unsichtbar zu machen
    driver = webdriver.Chrome(service=service, options=options)

    try:
        driver.get(website)
        print("Page loaded...")
        html = driver.page_source
        return html
    finally:
        driver.quit()


def split_dom_content(dom_content, max_length=6000):
    return [
        dom_content[i : i + max_length] for i in range(0, len(dom_content), max_length)
    ]


def scrape_heise_website(website):
    html  = scrape_website(website)

    # BeautifulSoup zum Parsen des HTML-Codes verwenden
    soup = BeautifulSoup(html, 'html.parser')

    # Artikel-Header und -Inhalt extrahieren
    # Der Header ist oft in einem <h1>-Tag zu finden
    header_title = soup.find('h1', {'class': 'a-article-header__title'}).get_text().strip()
    header_lead  = soup.find('p',  {'class': 'a-article-header__lead'}).get_text().strip()

    # Der eigentliche Artikelinhalt befindet sich oft in einem <div>-Tag mit der Klasse 'article-content'
    article_div = soup.find('div', {'class': 'article-content'})
    paragraphs = article_div.find_all('p') if article_div else []
    # 'redakteurskuerzel' entfernen
    for para in paragraphs:
        spans_to_remove = para.find_all('span', {'class': 'redakteurskuerzel'})
        for span in spans_to_remove:
            span.decompose()  # Entfernt den Tag vollständig aus dem Baum

    article_content = "\n".join([para.get_text().strip() for para in paragraphs])
    
    # Header und Artikelinhalt ausgeben
    result = "Header Title:" + header_title + "\nHeader Lead:" + header_lead + "\nContent:" + article_content
    return result

result = scrape_heise_website("https://www.heise.de/news/Streit-ueber-Kosten-Meta-kappt-Leitungen-zur-Telekom-9953162.html")
print(result)
Categories
Development Java Linux

GitHub Codespace

I was on JCON 2024 and beside other interesting talks I heard one talk about cloud-based IDEs, and I wanted to try out, if GitHub Codespaces could work for me.

Explore the evolving landscape of cloud-based integrated development environments (IDEs), focusing on Gitpod, GitHub codespaces and Devpod. Compare and contrast these cloud IDEs with traditional counterparts, emphasizing the role of container technology, specifically the devcontainer specification. The discussion includes advances, existing limitations, and the potential for developing polyglot, container-based distributed applications. A live demo illustrates the rapid setup and coding process across various languages and frameworks, showcasing testing capabilities and seamless deployment to Kubernetes. Discover how custom additions enhance flexibility. Additionally, uncover the impact of cloud IDEs on teaching and team projects, ensuring consistent development setups for enhanced efficiency and streamlined processes.

[EN] Codespaces, Gitpod, Devpod ... what cloud and container-based IDEs can do for you
by Matthias Haeussler (Novatec Consulting GmbH)

Create GitHub Account

Go to GitHub and create an account. Free plan is suitable.

Create Repository

Create a new repository with name “workshop”. Add a README file.

Create Codespace

TODO: funktioniert das GIF?

Change Keyboard Layout to German: In the lower right corner click on “Layout: US” and enter “German” in the upcoming window.

TODO: Ich hätte gerne die Sprache von Visual Code auf Englisch umgestellt. Wie?

Work in the Terminal

Copy & Paste

Type something into the terminal.
Mark it with your mouse.
One Right Click to copy into Clipboard.
Another Right Click to paste from Clipboard.

Timezone

Set Timzone to Europe -> Berlin

sudo dpkg-reconfigure tzdata

Internet

Do we have access to the Internet? Let’s try with curl:

curl google.com

HTTPie

A modern alternative to curl is HTTPie:

Install httpie:

sudo apt update && \
sudo apt upgrade -y && \
sudo apt install httpie -y

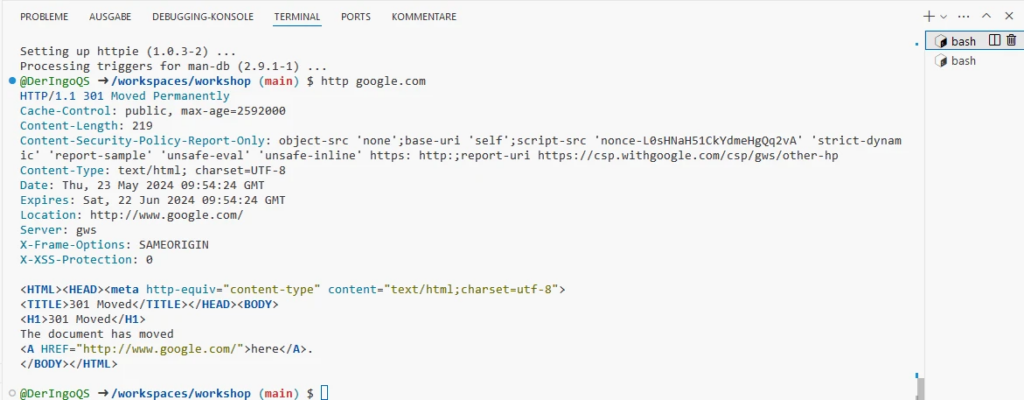
This will take a few minutes. Meanwhile we can work in another Terminal window. Later we come back and test HTTPie:

http google.com
Additional Terminal window

Open a second Terminal with bash:

VIM

ls -lisah
touch test.sh
ls -lisah
vim test.sh
chmod +x test.sh
./test.sh
name=Ingo
echo "My name is $name"
echo "But here I am: $(whoami)"

Python

Do we have Python in our Codespace? Which version(s)?

python3 --version
python --version
vim hello_world.py
python hello_world.py
# Print "Hello World" to the console 
print("Hello World") 

Docker

docker --version
docker-compose --version
docker run hello-world 

Apache HTTPD

docker run -p 8888:80 httpd

Open in Browser:

Find all open Ports in the Ports-Tab:

Normally Port 8888 should be listed here.
We need to add Port, just enter 8888:

Open Website just with a click on the Globus-Icon.

When we try to open the address in another browser, we will see a GitHub-Login.
When we login with another GitHub-Account, we will get a 404-error. Because the page is Private.
Switch to Public:

Now we can access the page in another brower.

At the end we can shutdown HTTPD with <STRG>+<C> in Terminal window. It should automatically disapear in the Ports-Tab. If not, you can remove it manually.

Microsoft Edge - Caching problem

Open the Public page in MS Edge.
Make the page Private again. Try to open in a new browser, won’t work.
Reload (the Public loaded) page in MS Edge: You can still see the site!
This is a cached version and we need to force MS Edge to reload from server.

Open Developer Tools (F12 or <STRG>+<SHIFT>+<I>), then you can Right Click on the reload button to have additional options:

Java

java --version
vim HelloWorld.java
javac HelloWorld.java
java HelloWorld
rm -f HelloWorld*
class HelloWorld { 
  public static void main(String args[]) { 
      System.out.println("Hello World"); 
  } 
}

Run Java Source as Shell Scripts

type -a java
# java is /home/codespace/java/current/bin/java
# java is /usr/local/sdkman/candidates/java/current/bin/java

vim HelloWorld.sh
chmod +x HelloWorld.sh
./HelloWorld.sh
rm HelloWorld.sh
#!/home/codespace/java/current/bin/java --source 21 

class HelloWorld { 
  public static void main(String args[]) { 
      System.out.println("Hello World"); 
  } 
}

Maven

Start

We create a new pom.xml from scratch.
We need a template. We will take “The Basics”-one from the Apache Maven POM Reference page.

    <project xmlns="http://maven.apache.org/POM/4.0.0" xmlns:xsi="http://www.w3.org/2001/XMLSchema-instance"
      xsi:schemaLocation="http://maven.apache.org/POM/4.0.0 https://maven.apache.org/xsd/maven-4.0.0.xsd">
      <modelVersion>4.0.0</modelVersion>
     
      <groupId>org.codehaus.mojo</groupId>
      <artifactId>my-project</artifactId>
      <version>1.0</version>
    </project>
mvn --version
vim pom.xml
mvn clean verify 

Sample Project

Open pom.xml in Explorer (GUI) and change:

  • org.codehaus.mojo to org.acme
  • my-project to workshop

No need to save: Changes are automatically saved

To doublecheck that everything is still ok run mvn clean verify  again.

mkdir -p src/main/java/org/acme
touch src/main/java/org/acme/HelloWorld.java 

Open HelloWorld.java with <STRG>+<MOUSECLICK> in GUI-Editor.

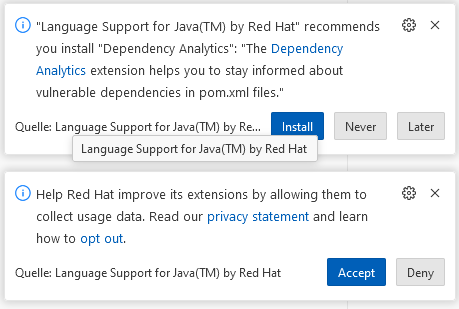
Install Extension Pack for Java as suggested:

And also the next two suggestions:
package org.acme;

class HelloWorld { 
  public static void main(String args[]) { 
      System.out.println("Hello World"); 
  } 
}
mvn package
java -classpath ./target/workshop-1.0.jar org.acme.HelloWorld

Maven - different version

In our Codespace we have Maven 3.9.6 and Java 21.
Let’s test with a different version. We will use Docker.

Official Maven Image on DockerHub.

We want to re-use the local Maven Cache. Let’s find out where it is:

sudo apt install locate -y
sudo updatedb
locate .m2
# /home/codespace/.m2

Adjust the “How to use this image” command:

docker run -it --rm \
--name workshop-maven-project \
-v /home/codespace/.m2:/root/.m2 \
-v "$(pwd)":/usr/src/workshop \
-w /usr/src/workshop \
maven:3.3-jdk-8 \
mvn clean package
java -classpath ./target/workshop-1.0.jar org.acme.HelloWorld

Sourcecode management

We have 7 uncommited changes, but only 2 files should go into the repository:
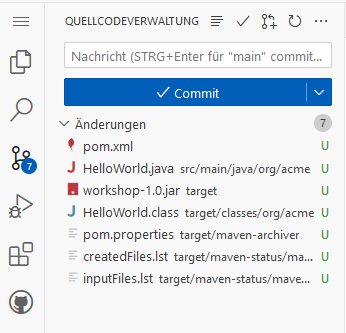
What we need is a .gitignore file.

touch .gitignore

There are two template files we will copy:

Now there are only 3 files we can commit:
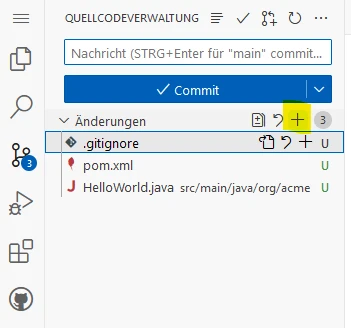
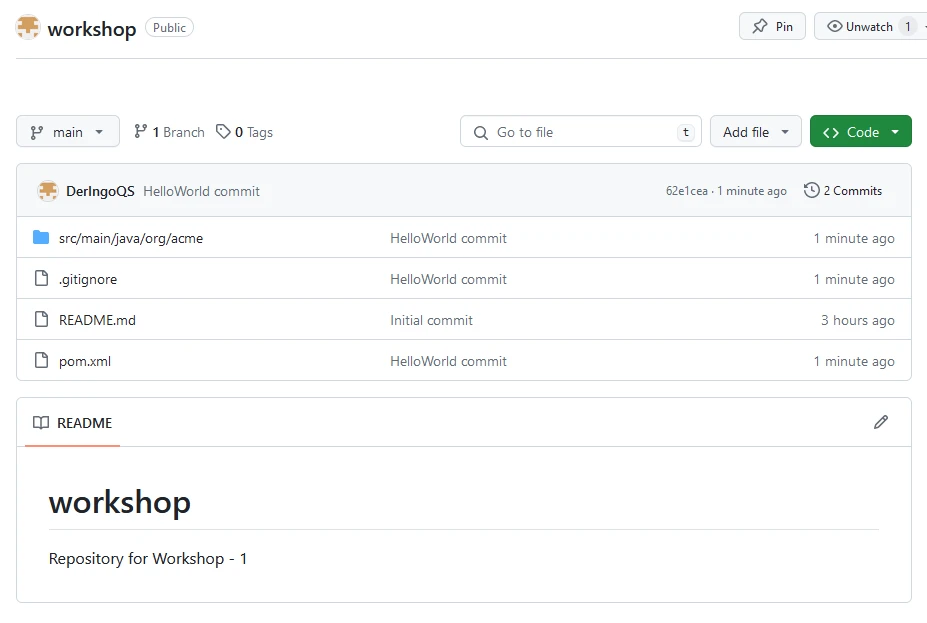
Now we can see these files in our repository:
Secrets

Use GitHub Secrets for API-keys etc.

In the upper-right corner of any page, click your profile photo, then click Settings. Under Codespaces we can set our secrets:
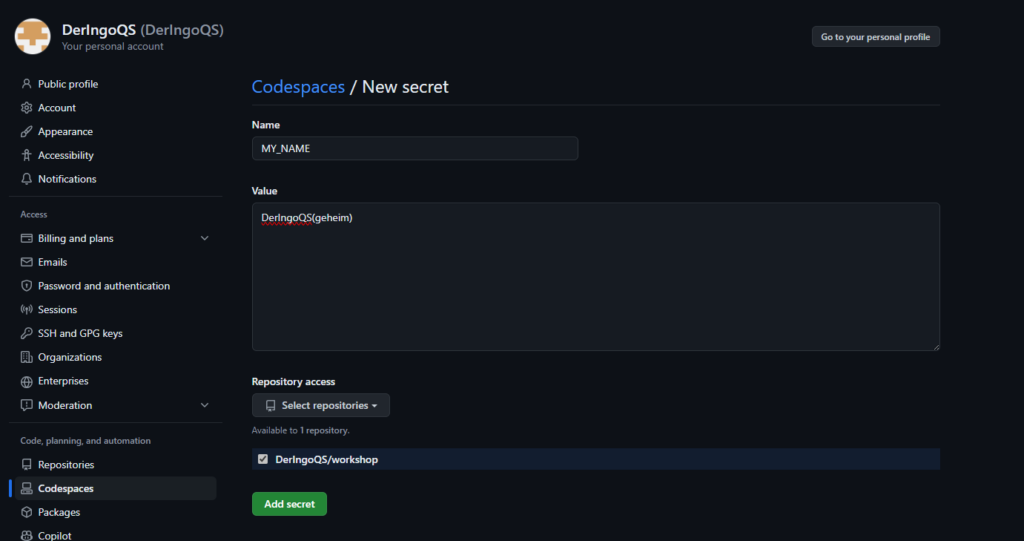
In our Codespace we can access the secret as environment variable:

A running codespace has to be restarted!

Cleanup

Delete all files:

rm -rf target && \
rm -rf src && \
rm pom.xml && \
rm README.md && \
rm .gitignore

Stage & commit changes:
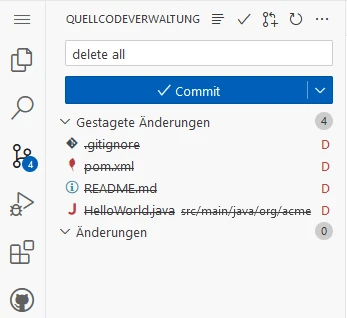
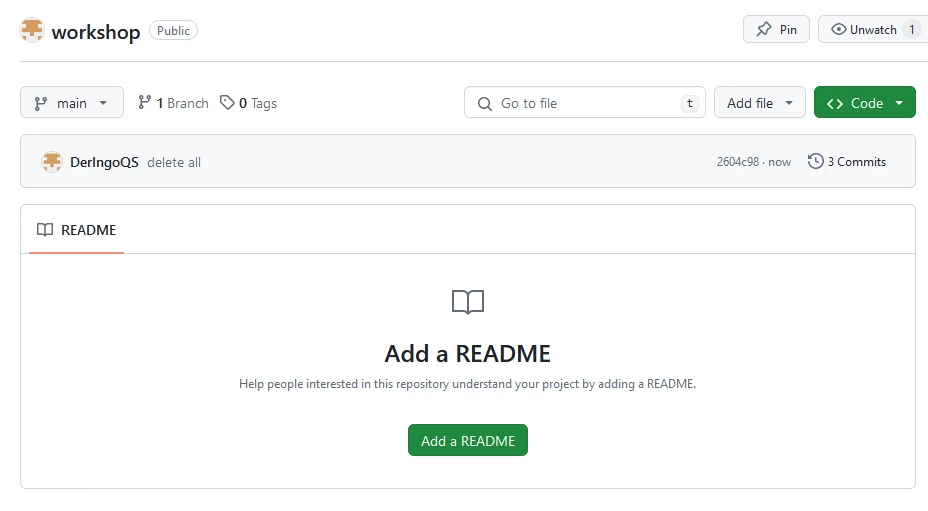
Now we have a clean repository:
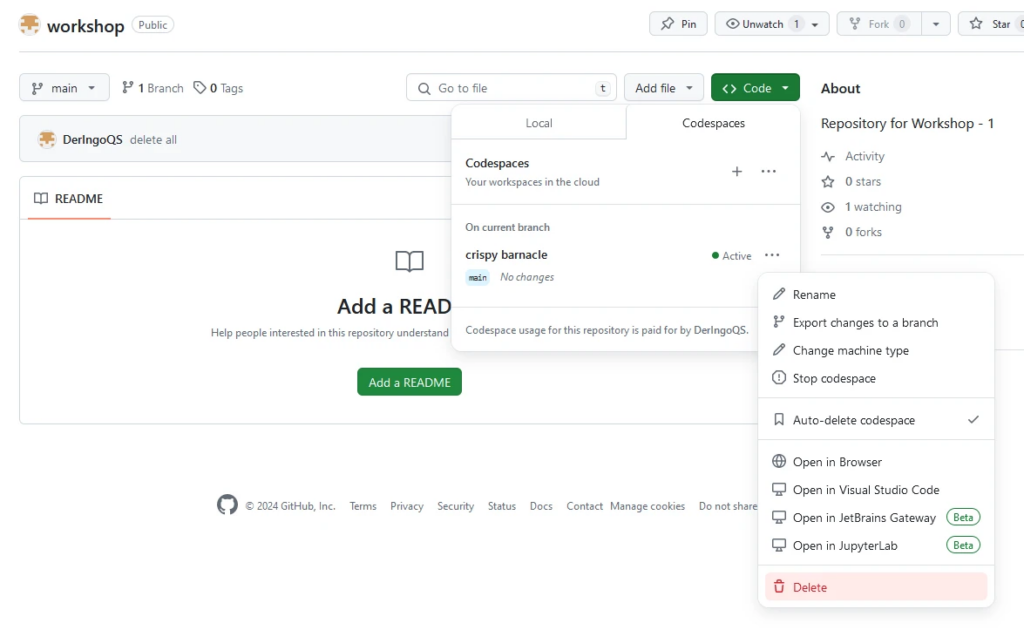
Close browser window with codespace and delete the codespace:
Delete the repository:

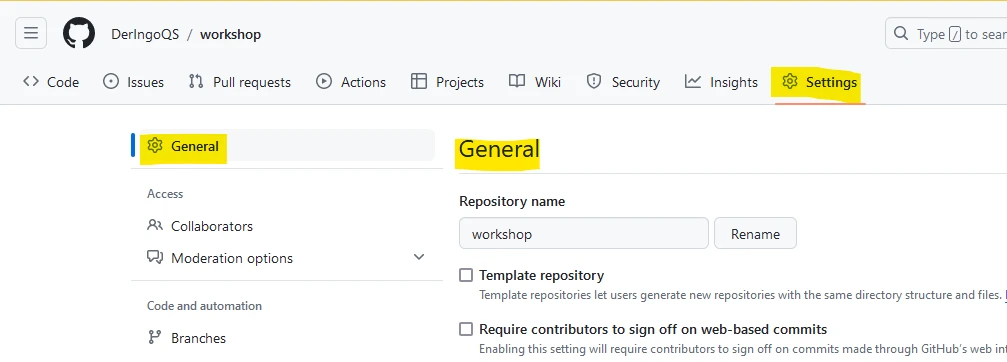
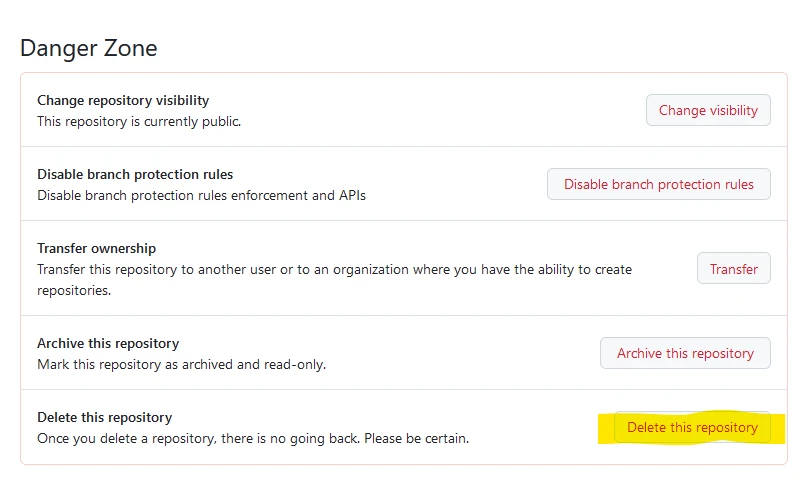
Go to Settings → General → Danger Zone → Delete this repository